Introduction
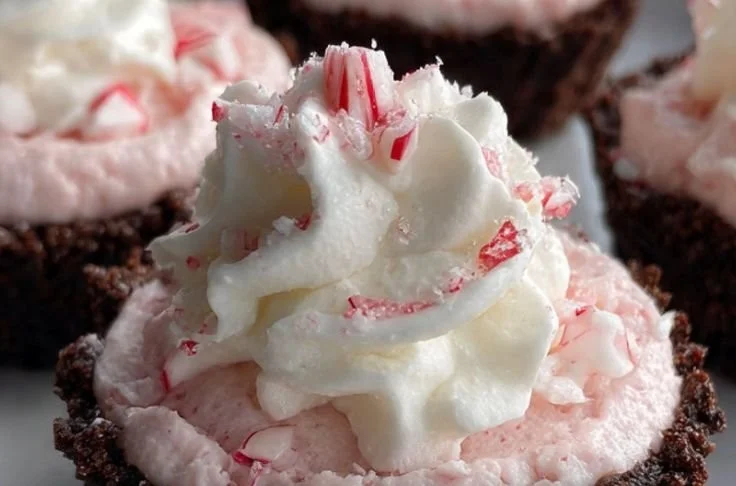
Close your eyes and picture the crackle of a chocolate cookie shell, the cool, silky sweetness of peppermint-kissed cream, and the bright, crisp snap of a tiny candy cane on top. These Peppermint Oreo Cups deliver all that — an intoxicating aroma of chocolate and mint, a melt-in-your-mouth cream cheese center, and a satisfying contrast between crumbly crust and pillowy filling. They’re the kind of treat that invites you to linger, hands sticky with whipped cream and cheeks warmed by holiday lights.
Perfect for holiday cookie swaps, an after-dinner sweet at a winter dinner party, or a cozy night when you want something festive but fuss-free, these bite-sized delights are deceptively simple to make and impossible not to share. If you enjoy playful makes that reimagine classic cookies, you might also like exploring other savory-turned-bite ideas like these baked taco cups for a completely different party vibe.
Dish Snapshot
- Prep Time: 20 minutes
- Cook Time: 8–10 minutes
- Total Time: 1 hour (includes chilling)
- Servings: about 24 mini cups
- Difficulty Level: Easy — perfect for bakers of all levels
Nutrition Highlights
Below is an approximate nutrition breakdown per mini Peppermint Oreo Cup (based on a batch of 24). Estimates are calculated from standard ingredient nutrition values (USDA FoodData Central and product labels such as Nabisco Oreo) and are intended as a guideline.
Per serving (1 mini cup):
- Calories: ~150 kcal
- Protein: ~1 g
- Carbohydrates: ~13 g
- Fat: ~8.5 g
- Fiber: ~0.3 g
- Sugars: ~10 g
- Sodium: ~70 mg
Note: These values are estimates and will vary depending on the exact brands and amounts used (e.g., reduced-fat or sugar-free substitutions). For more precise tracking, consult the USDA FoodData Central or product nutrition labels and enter your exact ingredients into a nutrition calculator.
Why You’ll Love It
There are few things as charming as a tiny, festive treat made with familiar flavors. These Peppermint Oreo Cups marry the nostalgia of Oreos with a grown-up peppermint cream that’s bright rather than cloying. They’re ideal for:
- Festive gatherings: Small, decorative, and easy to plate for cookie exchanges or dessert trays.
- Quick entertaining: Assemble ahead and chill; they look elegant with minimal effort.
- Memory-making: A perfect kid-friendly kitchen project — kids can press crumbs and drop candies while you handle the oven.
- Versatility: Customize the filling intensity, swap candies for garnish, or turn them into a holiday staple.
Step-by-Step Instructions
Ingredients
- 2 cups Oreo cookies, crushed (about 24 cookies, crushed into fine crumbs)
- 6 tablespoons unsalted butter, melted
- 8 ounces cream cheese, softened (room temperature)
- 1 cup powdered sugar
- 1 teaspoon peppermint extract
- 1–2 drops pink or red food coloring (optional)
- Whipped cream, for topping (store-bought or freshly whipped)
- Mini peppermint candies or candy canes, for garnish
Optional ingredients and substitutions
- Vegan: Use dairy-free cream cheese and vegan butter; substitute Oreos with certified vegan sandwich cookies if necessary.
- Gluten-free: Use gluten-free chocolate sandwich cookies in place of Oreos.
- Lower sugar: Use powdered erythritol or a confectioners’ sugar substitute in place of powdered sugar (adjust to taste).
- Extra mint: Add 1/4 teaspoon peppermint extract for a bolder flavor.
- Chocolate variation: Fold 1–2 tablespoons of melted dark chocolate into the filling for a mocha-mint twist.
Directions
- Preheat the oven to 350°F (175°C) and grease a mini muffin tin (about 24 cups).
- Combine the crushed Oreos and melted butter in a bowl until the mixture is evenly moistened and resembles wet sand.
- Press about 1 tablespoon of the mixture into each mini muffin cup, making sure to form a small well in the center to hold the filling.
- Bake the crusts for 8–10 minutes. While they are still warm from the oven, use the back of a teaspoon to gently press down the centers again to reinforce the cup shape. Let the cups cool completely in the tin.
- In a separate bowl, beat the softened cream cheese until smooth. Add the powdered sugar, peppermint extract, and food coloring (if using), and beat until the filling is silky and well combined. Avoid overbeating to keep the texture creamy rather than dense.
- Transfer the filling to a piping bag (or use a small spoon) and pipe or spoon the cream cheese mixture into the cooled Oreo cups. Fill to just below the rim.
- Top each filled cup with a small dollop of whipped cream and a mini peppermint candy or a tiny piece of candy cane for garnish.
- Chill the filled cups in the refrigerator for at least 20–30 minutes before serving to let the filling set.
Practical tips
- Soften the cream cheese at room temperature for 20–30 minutes for a smooth filling.
- If crumbs stick to your fingers while pressing, lightly grease your fingertip or use a small cookie scoop for even portions.
- Cool the crusts fully before filling; warm crusts can cause the filling to soften or sink.
- For neat presentation, pipe the filling and then gently smooth the top with a small offset spatula.
Best Pairings
- A bold espresso or dark roast coffee to balance the sweetness.
- Steamed milk or peppermint hot chocolate for a themed hot-beverage pairing.
- A simple fruit platter (berries) to add brightness and cut through richness.
- Place them on a festive platter with assorted cookies for a holiday dessert table.
Keeping it Fresh
Room temperature: Not recommended for long — keep covered at cool room temperature for up to 6–8 hours if serving the same day.
Refrigeration: Store in an airtight container in the fridge for 3–4 days. Best eaten within the first 48 hours for optimal texture.
Freezer: Place in a single layer on a tray to freeze solid, then transfer to a freezer-safe container for up to 1 month. Thaw in the refrigerator before serving; whipped cream toppings are best added fresh after thawing.
Pro Tips & Tricks
- Cookie crumbs: For the smoothest crust, pulse Oreos in a food processor to a fine crumb. Large chunks can break the cup shape.
- Pressing technique: Use the back of a small spoon or a round-bottom measuring spoon to press wells that are consistent in depth and shape.
- Avoid overmixing the filling: Overbeating cream cheese can make the filling airy and less stable; beat until just smooth.
- Garnish timing: Add fragile garnishes (like mini candy canes) just before serving to avoid condensation marks from refrigeration.
- Make-ahead strategy: Bake crusts in advance and refrigerate or freeze them until you’re ready to fill; fill and garnish the day of serving for best texture and appearance.
Creative Twists
- White Chocolate Peppermint: Fold 2 tablespoons melted white chocolate into the cream cheese filling for a luxe, creamy finish.
- Double Chocolate: Add 1 tablespoon unsweetened cocoa powder to the crust mixture for an extra chocolate kick.
- Peppermint Mocha: Add 1 teaspoon instant espresso powder to the filling for coffee notes that pair beautifully with peppermint.
- Vegan & Gluten-Free: Use vegan cream cheese and plant-based butter; replace Oreos with certified gluten-free sandwich cookies to accommodate dietary needs.
- Adult version: Spike the filling with 1–2 teaspoons of peppermint schnapps or crème de menthe (add just before serving; store chilled).
Common Questions & Answers
Q: Can I make these ahead of time?
A: Yes — bake the crusts up to a week ahead (refrigerated) or freeze for up to a month. Fill and garnish on the day you plan to serve for best texture.
Q: What can I use instead of cream cheese?
A: For a lighter filling, use mascarpone or a whipped cream-cheese blend. For a dairy-free option, use a firm vegan cream cheese.
Q: My crusts fell apart — what went wrong?
A: Likely not enough butter to bind the crumbs, or they weren’t pressed firmly enough into the tin. Add an extra tablespoon of melted butter and press firmly before baking.
Q: How can I reduce sugar?
A: Swap powdered sugar for a confectioners’ sugar substitute such as erythritol-based powdered sweetener, and consider using reduced-sugar Oreos or a lower-sugar cookie option.
Q: Can I make full-size cups instead of minis?
A: Yes — use a standard muffin tin, increase crust volume per cup, and bake for a slightly longer time (10–12 minutes). Adjust filling amounts accordingly.
Conclusion
These Peppermint Oreo Cups are a joyful little dessert: quick to make, delightful to eat, and endlessly customizable for holidays or everyday celebrations. If you try them, I’d love to hear how you decorated yours — share photos or variations and join the conversation. For more Oreo-inspired ideas and cupcake-friendly mint dessert inspiration, check out this minty recipe for Mint Oreo Cupcakes – Your Cup of Cake and this candy-cane riff on Oreo cupcakes at Candy Cane Oreo Cupcakes – JavaCupcake.
Print
Peppermint Oreo Cups
- Total Time: 60 minutes
- Yield: 24 mini cups 1x
- Diet: Vegetarian
Description
Delightfully festive bite-sized treats featuring a chocolate cookie crust and creamy peppermint filling, perfect for holiday gatherings.
Ingredients
- 2 cups Oreo cookies, crushed (about 24 cookies)
- 6 tablespoons unsalted butter, melted
- 8 ounces cream cheese, softened
- 1 cup powdered sugar
- 1 teaspoon peppermint extract
- 1–2 drops pink or red food coloring (optional)
- Whipped cream, for topping
- Mini peppermint candies or candy canes, for garnish
Instructions
- Preheat the oven to 350°F (175°C) and grease a mini muffin tin.
- Combine the crushed Oreos and melted butter until evenly moistened.
- Press about 1 tablespoon of the mixture into each mini muffin cup, forming a well in the center.
- Bake the crusts for 8–10 minutes; cool completely in the tin.
- In a bowl, beat the cream cheese until smooth. Add powdered sugar, peppermint extract, and food coloring, mixing until silky.
- Pipe or spoon the cream cheese mixture into the cooled cups, filling just below the rim.
- Top each with whipped cream and a mini peppermint candy or candy cane.
- Chill in the refrigerator for at least 20–30 minutes before serving.
Notes
For best results, chill the filled cups before serving. Customize the filling intensity or garnish as desired.
- Prep Time: 20 minutes
- Cook Time: 10 minutes
- Category: Dessert
- Method: Baking
- Cuisine: American
Nutrition
- Serving Size: 1 mini cup
- Calories: 150
- Sugar: 10g
- Sodium: 70mg
- Fat: 8.5g
- Saturated Fat: 4g
- Unsaturated Fat: 4.5g
- Trans Fat: 0g
- Carbohydrates: 13g
- Fiber: 0.3g
- Protein: 1g
- Cholesterol: 30mg