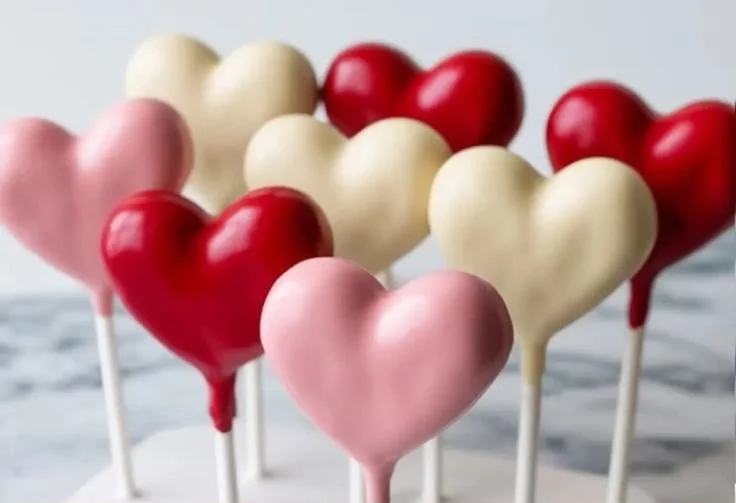
Valentine’s Day Cake Pops
There’s something instantly magical about a tiny, hand-held dessert that delivers a burst of cake, creaminess, and chocolate in one bite. Imagine sweet, vanilla-scented crumbs wrapped around creamy frosting, dipped in glossy red candy coating that snaps with a delicate crunch — the aroma of butter and cocoa, the soft, almost melt-in-your-mouth texture of cake, and the visual delight of little heart shapes dotted with sprinkles. These Valentine’s Day Cake Pops are a small gesture with big feelings: playful, indulgent, and perfect for sharing with someone you love.
If you’re inspired by classic red-velvet flavors, take a peek at this red velvet cake pops inspiration to adapt color and flavor easily. Whether you’re gifting them, assembling a dessert table, or making a cozy weekend treat, these cake pops bring warmth and sweetness to any moment.
At a Glance
- Prep Time: 25 minutes (active)
- Cook Time: 25–35 minutes (if baking a cake from scratch or boxed mix)
- Total Time: ~1 hour (includes chilling and coating time)
- Servings: about 24 cake pops (depending on size)
- Difficulty Level: Easy–Intermediate (basic shaping and dipping skills required)
Nutrition Highlights
Estimated nutrition per serving (1 cake pop — yields ~24)
- Calories: 180 kcal
- Protein: 1.5 g
- Carbohydrates: 24 g
- Fat: 8 g
- Saturated Fat: 5 g
- Sugars: 18 g
- Fiber: 0.5 g
- Sodium: 120 mg
Notes on accuracy: These values are estimates calculated from standard ingredient profiles (cake mix, frosting, candy melts) using USDA FoodData Central guidelines and general nutritional guidance from reputable health resources (for context on added sugars and portion advice, see resources such as Mayo Clinic and the CDC). Actual values will vary based on the cake mix brand, frosting recipe, and size of each pop — for the most accurate tracking, use your specific ingredient labels or the USDA FoodData Central entry for each component.
Why You’ll Love It
- Irresistible taste and texture: The combination of moist cake and creamy frosting yields a tender, cohesive bite that contrasts beautifully with the crisp candy shell.
- Perfect for sharing & celebrations: These pops are festive, giftable, and easy to portion—ideal for Valentine’s Day parties, classroom treats, or romantic picnics.
- Quick and adaptable: Using a boxed cake mix and store-bought frosting gets you from oven to pops in under an hour; from there you can customize flavors, colors, and decorations.
- Emotional connection: Small, handmade sweets like these make thoughtful gifts that communicate care through time, craft, and presentation.
Step-by-Step Instructions
Ingredients (yields ~24 pops)
- 1 box (about 15–16 oz) cake mix, baked according to package instructions (or 1 homemade cake, cooled)
- 1 cup frosting (any flavor; cream cheese or buttercream work great)
- 12–16 oz candy melts (red and other color accents as desired)
- 24 lollipop sticks
- Sprinkles, edible glitter, or other edible decorations
Optional ingredients & substitutions
- For a red-velvet version: use a red-velvet cake mix or add 1–2 tbsp cocoa + red gel food coloring to a vanilla mix.
- Vegan option: use a vegan cake recipe and dairy-free frosting with vegan candy melts.
- Gluten-free: use a gluten-free cake mix and ensure all coatings are certified gluten-free.
- Flavor boosters: 1 tsp vanilla extract, 1–2 tsp instant espresso for chocolate depth, or 1 tsp orange zest for a bright lift.
Method
- Bake the cake: Prepare the cake according to package or recipe instructions. Let it cool completely.
- Crumble the cake: Crumble the cooled cake into a large bowl until there are no large chunks.
- Mix with frosting: Add the 1 cup of frosting to the crumbs and mix gently with a spatula until the mixture holds together when squeezed. Avoid overmixing — you want cohesion, not a batter.
- Shape the pops: Form the mixture into hearts or balls (about 1.25–1.5 inches in diameter). Place them on a baking sheet lined with parchment.
- Insert sticks: Dip the tip of each lollipop stick into slightly melted candy coating (about 1/2 inch) and insert it halfway into each cake pop. This ‘glue’ helps the stick stay secured.
- Chill: Freeze or refrigerate the cake pops for about 30 minutes (or until firm). This prevents them from falling apart in the next step.
- Melt candy melts: Melt candy melts according to package directions (microwave in short bursts or use a double boiler), stirring until smooth.
- Dip the pops: Holding a pop by the stick, dip it into the melted candy, tapping gently on the bowl’s edge to remove excess coating. Ensure full coverage.
- Decorate: Add sprinkles or decorations before the coating sets.
- Set & enjoy: Stand the pops upright (use a block of styrofoam or a drying rack) until fully set. Serve or package for gifting.
Practical tips
- If a cake pop cracks when dipped, poke the center with the stick, cover with more coating, and let sit; chilled pops are less likely to crack.
- Work in small batches with the coating to maintain ideal dipping temperature (candy melts thicken as they cool).
- Use gel food coloring if adjusting candy melt color — liquid colors can seize candy melts.
Best Pairings
- Beverage pairings: Serve with a robust coffee, espresso, or a floral tea (e.g., rose or chamomile) to balance sweetness.
- Dessert board: Arrange pops alongside fresh berries, macarons, and dark chocolate squares for a romantic dessert platter.
- Gift presentation: Place 6–12 pops in a decorative box with tissue paper or a mason jar filled with ribboned straws for a charming, portable gift.
- Snack ideas: Enjoy one pop plain for a quick sweet fix, or pair with vanilla ice cream for a playful deconstructed sundae.
(For a cupcake-style frosting technique and more red-velvet ideas, see this red velvet cupcakes for Valentine’s inspiration.)
Storage Instructions
- Room temperature: If fully coated and kept in an airtight container in a cool, dry place, cake pops can stay fresh for 1–2 days.
- Refrigeration: Store in an airtight container in the refrigerator for up to 5 days. Allow to come to room temperature before serving for best flavor and texture.
- Freezer: Well-wrapped and stored in a freezer-safe container, cake pops can last up to 2 months. Thaw in the refrigerator overnight, then bring to room temperature before serving.
Pro Tips & Tricks
- Cake consistency: Aim for a dough-like texture after mixing cake and frosting. If too wet, add a few extra crumbs; if too dry, add a teaspoon of frosting at a time.
- Stick stability: Use just enough melted coating on the stick tip as “glue” — too much makes the pop top-heavy.
- Smooth coating: Keep candy melts warm but not hot. A microwave at 50% power in 20–30 second intervals with stirring prevents burning.
- Prevent sweating: After refrigeration, avoid sudden temperature changes that can cause condensation on the coating; let pops sit in the fridge an hour before bringing them to room temp.
- Decorative control: Use squeeze bottles or parchment cones to drizzle contrasting colors for precise lines.
Creative Twists
- Chocolate-covered raspberry: Fold a tablespoon of raspberry jam into the cake/frosting mixture and dip in dark chocolate candy melts; top with freeze-dried raspberry powder.
- Coffee-kissed mocha: Add 1 tsp instant espresso to the frosting for a coffee flavor and dip in mocha-colored candy melts; sprinkle with finely chopped espresso beans.
- Vegan & gluten-free: Use a vegan cake recipe with coconut oil-based frosting and certified vegan candy melts. Swap regular flour cake for a gluten-free mix for guests with sensitivities.
Recipe Q&A
Q: Can I use homemade cake and frosting instead of boxed/ready-made?
A: Yes — homemade cake and frosting work beautifully. Ensure the cake is fully cooled before crumbling and use a frosting that’s dense enough to bind crumbs.
Q: Why are my cake pops falling off the sticks?
A: Common causes: pops were not chilled enough before dipping, too much frosting made them heavy, or stick not secured with melted coating. Chill longer and use the “glue” method before inserting sticks.
Q: How can I make them less sweet?
A: Use less-sweet frosting, dip in dark chocolate or dark-colored candy melts, and avoid sugary decorations. Reducing frosting slightly will also lower sweetness.
Q: Are there healthier swaps?
A: Try reduced-sugar frosting, smaller portions, or whole-grain cake recipes. Note nutrition will change — refer to ingredient labels and USDA tools for recalculations.
Q: How to fix cracked coating?
A: Warm a small amount of candy melt, brush over the crack with a pastry brush, and re-set. If severe, re-dip the pop.
Conclusion
Thank you for reading — these Valentine’s Day Cake Pops are a charming, shareable way to celebrate love with flavor and flair. For a commercial take on a seasonal pop and to see how cafes style theirs, check out this charming reference to the Valentine Cake Pop at Starbucks. If you want another home recipe walkthrough and visual inspiration, the Easy Valentine’s Day Cake Pops Recipe at It’s a Hero offers step-by-step photos and ideas to expand your decorating palette.
I’d love to see your creations — share photos, tag the blog, and join the community of home bakers turning tiny sweets into big smiles.
Print
Valentine’s Day Cake Pops
- Total Time: 60 minutes
- Yield: 24 servings 1x
- Diet: Vegetarian
Description
Delightful bite-sized cake pops bursting with vanilla flavor, creamy frosting, and a glossy red candy coating, perfect for sharing on Valentine’s Day.
Ingredients
- 1 box (about 15–16 oz) cake mix, baked according to package instructions
- 1 cup frosting (any flavor; cream cheese or buttercream work great)
- 12–16 oz candy melts (red and other color accents as desired)
- 24 lollipop sticks
- Sprinkles, edible glitter, or other edible decorations
Instructions
- Bake the cake according to package or recipe instructions. Let it cool completely.
- Crumble the cooled cake into a large bowl until there are no large chunks.
- Add the frosting to the crumbs and mix gently with a spatula until the mixture holds together when squeezed.
- Form the mixture into hearts or balls (about 1.25–1.5 inches in diameter) and place them on a baking sheet lined with parchment.
- Dip the tip of each lollipop stick into slightly melted candy coating and insert it halfway into each cake pop.
- Chill the cake pops for about 30 minutes (or until firm).
- Melt candy melts according to package directions.
- Holding a pop by the stick, dip it into the melted candy, tapping gently on the bowl’s edge to remove excess coating.
- Add sprinkles or decorations before the coating sets.
- Stand the pops upright until fully set. Serve or package for gifting.
Notes
If a cake pop cracks when dipped, poke the center with the stick and cover with more coating. Chilled pops are less likely to crack.
- Prep Time: 25 minutes
- Cook Time: 35 minutes
- Category: Dessert
- Method: Baking
- Cuisine: American
Nutrition
- Serving Size: 1 cake pop
- Calories: 180
- Sugar: 18g
- Sodium: 120mg
- Fat: 8g
- Saturated Fat: 5g
- Unsaturated Fat: 2g
- Trans Fat: 0g
- Carbohydrates: 24g
- Fiber: 0.5g
- Protein: 1.5g
- Cholesterol: 0mg