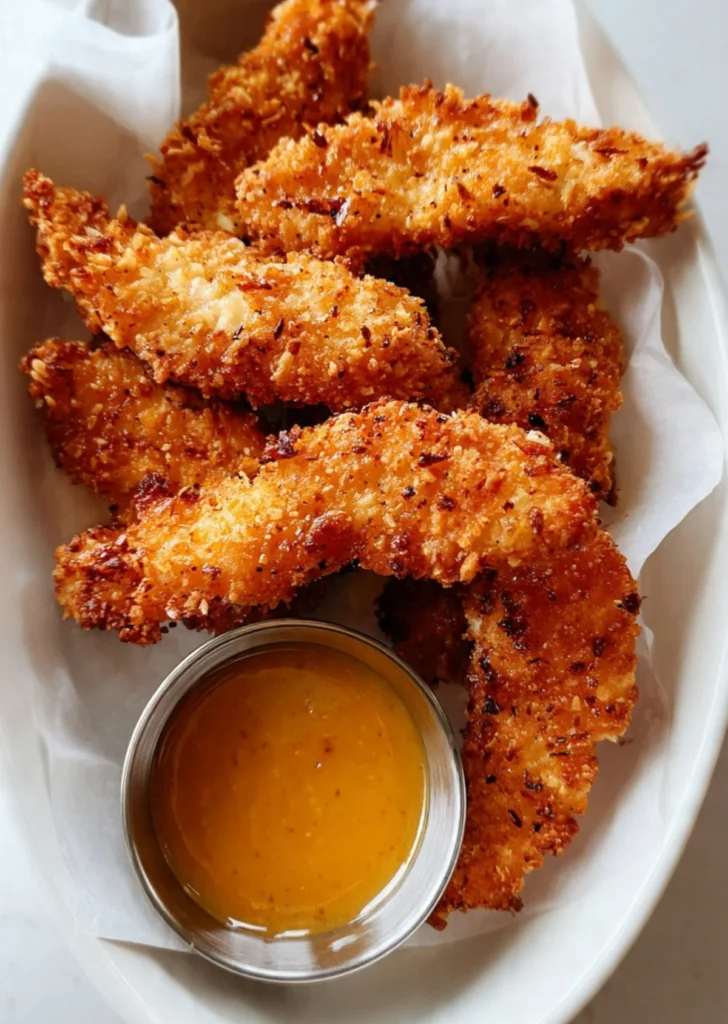
Crispy Chicken Tenders
Introduction
The first bite of these crispy chicken tenders is a small moment of joy: a satisfying crack of golden crust, steam rising to carry the warm, savory aroma of garlic and paprika, and a tender, juicy interior that melts on the tongue. The contrast of textures — ultra-crisp on the outside, silky and moist within — is irresistible. Whether you’re feeding a hungry family, hosting a casual game-night spread, or craving a comforting solo dinner, these tenders deliver that familiar, comforting flavor that makes everyone smile.
This recipe is perfect for busy weeknights (fast to prep, faster to devour), weekend gatherings where finger food rules, and lazy weekend breakfasts if you love a savory start. If you enjoy experimenting, try pairing the tenders with bright dips for a twist — for inspiration, I sometimes riff on sandwich ideas like a crispy Caesar sandwich for a heartier option using the same golden tenders (see this crispy chicken Caesar sandwich recipe for a related idea: crispy chicken Caesar sandwich).
At a Glance
- Prep Time: 20 minutes (plus 10 minutes resting time for breading)
- Cook Time: 12–16 minutes (frying in batches)
- Total Time: ~45 minutes
- Servings: 4 (about 3–4 tenders per person, depending on appetite)
- Difficulty Level: Easy — great for beginner cooks
Nutrition Highlights
Estimated nutrition per serving (1/4 of recipe). These values are estimates calculated using USDA FoodData Central values for raw chicken breast, flour, cornstarch, buttermilk, egg, and cooking oil; serving sizes and absorption are approximated. Use these as a guideline; exact values will vary with brands and frying oil absorption.
- Calories: ~600 kcal
- Protein: ~52 g
- Carbohydrates: ~34 g
- Fat: ~22 g
- Saturated Fat: ~4.5 g
- Fiber: ~1 g
- Sodium: ~700 mg (depends on added salt and product sodium)
Notes on accuracy: ingredients like oil absorption during frying and the exact cut/trim of the chicken cause variation. Values are based on USDA FoodData Central estimates and standard food composition tables; consult your nutrition app or product labels if you need precise data for dietary restrictions.
Perfect For…
This recipe shines when you want crowd-pleasing comfort with minimal fuss. It’s ideal for:
- Casual gatherings and game nights — finger food that disappears fast.
- Weeknight dinners when you want something fast, crispy, and satisfying.
- Meal-prep protein — make extra and reheat for wraps or salads.
- Family nostalgia — the crispy, seasoned coating taps into childhood favorites and shared memories around the dinner table.
How to Make Crispy Chicken Tenders
Ingredients
- 1.5 pounds chicken tenders (about 680 g)
- 1 cup all-purpose flour (about 125 g)
- 1/4 cup cornstarch (about 32 g)
- 1 cup buttermilk
- 1 large egg
- 1 teaspoon paprika
- 1 teaspoon garlic powder
- 1 teaspoon onion powder
- 1 teaspoon salt
- 1/2 teaspoon black pepper
- Oil for frying (canola or vegetable), enough for about 1–2 inches in a skillet or to fill a Dutch oven for deep frying
Optional ingredients and substitutions:
- For extra heat: add 1/2 teaspoon cayenne or smoked paprika.
- For gluten-free: substitute gluten-free flour and replace cornstarch with additional rice flour or certified gluten-free cornstarch.
- For lower-fat baking: see variations below for oven-baked method.
- For herb notes: add 1 tablespoon dried parsley or 1 teaspoon dried thyme to the flour mix.
Method & Process
- Prepare your workspace: set up three stations — flour mixture, wet mixture, and a tray for coated tenders.
- Heat oil in a heavy skillet or Dutch oven to 350°F (175°C). Use a thermometer for accuracy; maintaining temperature keeps the tenders crispy and prevents sogginess.
- In one bowl, combine:
- 1 cup all-purpose flour
- 1/4 cup cornstarch
- 1 teaspoon paprika
- 1 teaspoon garlic powder
- 1 teaspoon onion powder
- 1 teaspoon salt
- 1/2 teaspoon black pepper
Whisk to blend evenly.
- In another bowl, whisk together:
- 1 cup buttermilk
- 1 large egg
until smooth.
- Working one piece at a time, dip each chicken tender into the flour mixture, shaking off excess, then into the buttermilk-egg mixture, then back into the flour mixture. Press the flour onto the chicken so the coating adheres well.
- Place the coated tenders on a wire rack or tray and let them rest for 10 minutes. This resting step helps the breading stick and reduces falling-off during frying.
- Fry tenders in batches at 350°F, about 3–4 minutes per side, until golden brown and the internal temperature reaches 165°F (74°C). Avoid crowding the pan — crowding drops oil temp and yields greasy results.
- Remove tenders to a wire rack set over a sheet pan to drain and stay crispy. If needed, keep cooked tenders warm in a 200°F (95°C) oven for up to 20 minutes before serving.
- Serve hot with your favorite dipping sauces.
Practical tips:
- Use a digital thermometer for oil and chicken doneness — visual cues are helpful but temp is sure.
- Don’t overmix or overwork chicken when coating; handle gently to keep texture tender.
- If you don’t have buttermilk, make a quick substitute: 1 cup milk + 1 tablespoon vinegar or lemon juice, let sit 5–10 minutes.
- Reheat leftovers in a 400°F (200°C) oven or air fryer for a few minutes to regain crispness.
Best Pairings
- Classic dips: honey mustard, BBQ sauce, ranch, or spicy buffalo sauce.
- For a picnic: serve alongside coleslaw and pickles.
- Sandwich idea: tuck tenders into a brioche bun with lettuce, pickles, and a swipe of garlic aioli.
- Brunch pairing: serve with scrambled eggs and roasted potatoes, or alongside coffee/tea for a savory morning option.
- Try pairing with tangy sides: I like a dill-pickle slaw for contrast — for a complementary twist, explore this dill pickle Parmesan chicken idea: crispy dill-pickle Parmesan chicken.
Shelf Life & Storage
Follow USDA food-safety guidance for storing cooked poultry:
- Room temperature: Do not leave cooked tenders at room temperature longer than 2 hours (or 1 hour above 90°F). Bacteria growth can increase rapidly beyond this window.
- Refrigeration: Store in an airtight container in the fridge for 3–4 days.
- Freezer: Freeze in a single layer on a tray, then transfer to a freezer bag or airtight container for up to 2–3 months. Reheat from frozen in a 400°F oven or air fryer until heated through and crisp.
Chef’s Advice
- Oil temperature is everything: keep it steady around 350°F. If it’s cooler, tenders absorb more oil; if too hot, the outside burns before the inside cooks.
- Cornstarch in the flour mix creates a lighter, extra-crispy crust — don’t skip it.
- Resting the coated tenders is a small step that makes a big difference; it helps the flour adhere and reduces loss of breading in the oil.
- For uniform cooking, choose tenders of similar thickness. If pieces vary, gently pound thicker pieces to match.
- Use a wire rack (not paper towels) to drain fried tenders so they stay crisp instead of steaming.
Creative Twists
- Oven-Baked “Crispy” Tenders: For less oil and less fuss, bake at 425°F on a wire rack over a sheet tray, spritzing with oil, for 12–16 minutes, flipping once. (For an oven-focused approach, see recipes for truly crispy oven-baked tenders for technique ideas.)
- Panko Parmesan Crunch: Replace half the all-purpose flour with panko breadcrumbs and fold in 1/3 cup grated Parmesan for a crunchier, nutty crust.
- Spicy Korean-Style: Add 2 tablespoons gochujang to the buttermilk mixture and increase garlic powder; finish with a drizzle of honey and sesame seeds.
- Gluten-Free Version: Use a 1:1 gluten-free flour blend plus potato starch or extra cornstarch for crispness.
All Your Questions Answered
Q: Can I bake these instead of frying?
A: Yes — you can bake at 425°F on a wire rack for 12–16 minutes, turning once, and spritz with oil. Texture will be crispier if you use panko and a hot oven.
Q: How do I re-crisp leftovers?
A: Reheat in a 400°F oven or air fryer for 6–8 minutes until hot and crisp. Avoid microwaving unless you’re okay with a softer crust.
Q: Can I use frozen tenders?
A: If using frozen raw tenders, thaw fully in the refrigerator before breading to ensure even coating and safe cooking.
Q: Is there a healthier option?
A: Yes — oven-baked tenders or air-fried tenders use significantly less oil. Using lean chicken and lighter coatings (e.g., panko + spray oil) reduces calories and fat.
Q: My breading fell off while frying — what went wrong?
A: Common reasons are: insufficient pressing of coating onto the chicken, skipping the rest time before frying, or oil temperature being too low. Make sure to press the coating and let it rest 10 minutes; keep oil at 350°F.
Conclusion
If you’re after crunchy, golden perfection with juicy meat inside, this crispy chicken tenders recipe is an easy, reliable way to get there. Try the recipe as written, experiment with the variations, and share your photos and tweaks — I love seeing how readers make it their own. For a different frying technique and extra-crispy inspiration, check out this guide to extra-crispy fried chicken fingers, and if you want a lower-mess oven approach, this truly crispy oven-baked chicken tenders recipe has helpful techniques you can adapt. Enjoy — and come back to tell me how yours turned out!
Print
Crispy Chicken Tenders
- Total Time: 45 minutes
- Yield: 4 servings 1x
- Diet: Paleo
Description
Delicious and easy-to-make crispy chicken tenders that are perfect for any occasion.
Ingredients
- 1.5 pounds chicken tenders (about 680 g)
- 1 cup all-purpose flour (about 125 g)
- 1/4 cup cornstarch (about 32 g)
- 1 cup buttermilk
- 1 large egg
- 1 teaspoon paprika
- 1 teaspoon garlic powder
- 1 teaspoon onion powder
- 1 teaspoon salt
- 1/2 teaspoon black pepper
- Oil for frying (canola or vegetable)
Instructions
- Prepare your workspace: set up three stations — flour mixture, wet mixture, and a tray for coated tenders.
- Heat oil in a heavy skillet or Dutch oven to 350°F (175°C).
- In one bowl, combine flour, cornstarch, paprika, garlic powder, onion powder, salt, and black pepper; whisk to blend evenly.
- In another bowl, whisk together buttermilk and egg until smooth.
- Working one piece at a time, dip each chicken tender into the flour mixture, then into the buttermilk-egg mixture, and finally back into the flour mixture, pressing the flour onto the chicken.
- Place the coated tenders on a wire rack or tray and let them rest for 10 minutes.
- Fry tenders in batches at 350°F for about 3-4 minutes per side, until golden brown and internal temperature reaches 165°F (74°C).
- Remove tenders to a wire rack set over a sheet pan to drain and stay crispy. Keep warm in a 200°F (95°C) oven if needed before serving.
- Serve hot with your favorite dipping sauces.
Notes
For lower-fat baking, consider baking at 425°F on a wire rack for 12-16 minutes. Optionally, add herbs or spices for flavor variations.
- Prep Time: 30 minutes
- Cook Time: 15 minutes
- Category: Main Course
- Method: Frying
- Cuisine: American
Nutrition
- Serving Size: 3-4 tenders
- Calories: 600
- Sugar: 1g
- Sodium: 700mg
- Fat: 22g
- Saturated Fat: 4.5g
- Unsaturated Fat: 10g
- Trans Fat: 0g
- Carbohydrates: 34g
- Fiber: 1g
- Protein: 52g
- Cholesterol: 186mg