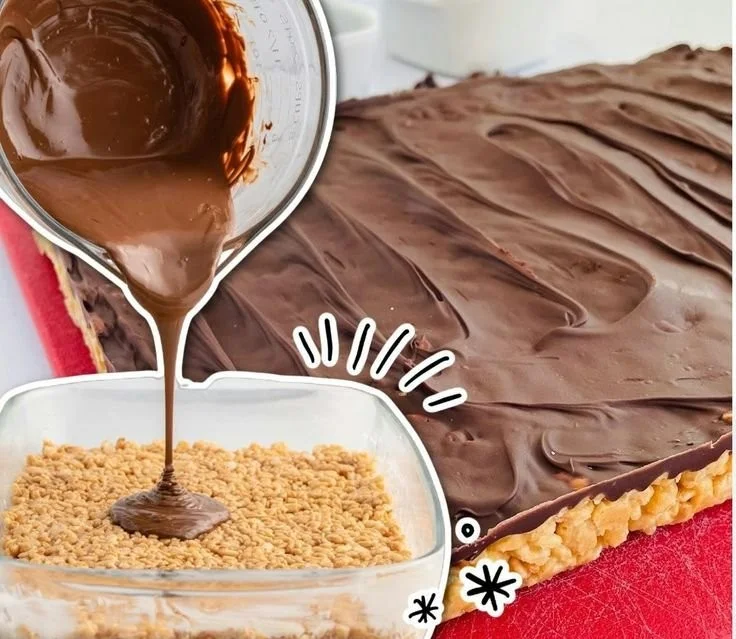
Peanut Butter Rice Krispie Treats
There’s something instantly comforting about the smell of warm peanut butter and toasted cereal filling the kitchen — sweet, nutty, and nostalgic all at once. These Peanut Butter Rice Krispie Treats crisp at the edges, chewy in the center, and finished with a glossy chocolate top that cracks satisfyingly with every bite. Imagine the first forkful: the pillowy marshmallow and peanut butter mingle with the airy crunch of Rice Krispies, while a ribbon of chocolate adds a silky, slightly bitter contrast that keeps you reaching for one more square.
This recipe is perfect for quick celebrations, school bake sales, cozy weekend baking with kids, or as a portable treat to brighten a lunchbox. It comes together in minutes and makes a batch that’s great for sharing at potlucks or wrapping up for gifts. If you like experimenting with cereal-based bars, try a fruity twist like a banana-Rice-Krispie mashup inspired by similar recipes such as banana Rice Krispie treats for another fun family-friendly option.
At a Glance
- Prep Time: 10 minutes
- Cook Time: 5–7 minutes
- Total Time: 15–20 minutes (plus cooling)
- Servings: about 12 squares
- Difficulty Level: Easy — great for beginners and kids
Nutrition Highlights
Estimated nutrition per serving (1 of 12 squares). These values are approximations derived from standard ingredient profiles (USDA FoodData Central) and should be used as a guideline only.
- Calories: ~250 kcal
- Protein: ~6–7 g
- Carbohydrates: ~20–25 g (of which sugars ~10–12 g)
- Fat: ~17–19 g (saturated fat ~6–8 g)
- Fiber: ~2–3 g
- Sodium: ~150–220 mg
Notes: These estimates use typical values for peanut butter, Rice Krispies cereal, butter, marshmallows, and semi-sweet chocolate chips. If you need precise numbers for dietary tracking, weigh your ingredients and check the exact product labels or the USDA FoodData Central database. For general guidance on daily nutrient recommendations, resources from the CDC and other public health sites are useful references.
Why You’ll Love It
- Irresistible taste and texture contrast: creamy peanut butter and marshmallow with crisp cereal and a chocolate finish.
- Nostalgic and crowd-pleasing: these evoke childhood memories while still feeling a little grown-up thanks to the peanut-chocolate combo.
- Speed and simplicity: a hands-on, stovetop recipe you can complete in under 20 minutes — perfect when you want homemade treats without fuss.
- Versatile for occasions: casual snacks, dessert bars for parties, or wrapped up as small gifts during the holidays.
How to Make Peanut Butter Rice Krispie Treats
Ingredients
- 4 cups Rice Krispies cereal
- 1 cup peanut butter (smooth or crunchy)
- 1 cup marshmallows (about 50–60 g; mini or chopped large marshmallows)
- 1/2 cup chocolate chips (semi-sweet or dark)
- 1/4 cup butter (unsalted or salted, 56–57 g)
Optional ingredients and substitutions
- Swap peanut butter for almond butter or sunflower seed butter (for nut-free households).
- Use vegan marshmallows and vegan butter to make a vegan version.
- Replace chocolate chips with chopped chocolate, butterscotch chips, or caramel drizzle.
- Add 1/2 cup chopped nuts or toasted coconut for texture.
Method (Step-by-step)
- Lightly grease an 8×8 or 9×9-inch pan and set aside.
- In a medium saucepan over low heat, melt the butter and peanut butter together, stirring until smooth and well combined. Keep the heat low to prevent scorching.
- Add the marshmallows to the peanut butter mixture and stir continuously until the marshmallows are fully melted and the mixture is glossy and smooth. Remove from heat immediately.
- Add the Rice Krispies cereal to the saucepan and gently fold until every flake is coated in the marshmallow-peanut butter mixture. Work quickly — the mixture sets fast.
- Press the mixture firmly into the prepared pan using a greased spatula or the back of a piece of parchment paper to achieve an even surface.
- In a microwave-safe bowl or small saucepan, melt the chocolate chips (microwave in 15-20 second bursts, stirring between, or use a double boiler), then spread the melted chocolate over the pressed treats. Let the top set at room temperature or chill briefly to speed up firming.
- Once set, cut into squares with a sharp knife. For cleaner cuts, chill for 10–15 minutes before slicing.
Practical tips
- Don’t over-stir the cereal once mixed; overworking can make the bars dense.
- Press the mixture firmly but avoid compacting it so much that it becomes rock-hard — you want chew plus crunch.
- If your marshmallow mixture seems dry, add a teaspoon of butter or a splash of corn syrup to loosen it.
- For neat chocolate topping lines, chill the bars until the chocolate is just tacky, then score with a knife.
Serving Suggestions
- Serve plain for a nostalgic snack, or warm briefly (5–7 seconds) to soften the chocolate before serving.
- Spread a thin pat of butter on a square and warm slightly for an extra-rich mouthfeel.
- Pair with coffee or cold milk for an indulgent afternoon break.
- Turn them into dessert sandwiches: place a scoop of vanilla ice cream between two squares for an instant ice cream sandwich.
- For an inspired pairing or to explore other peanut-chocolate combos, check out this decadent chocolate peanut butter ooey-gooey cake for dessert party ideas.
How to Store
- Room temperature: Keep in an airtight container at room temperature for 2–3 days. Use wax paper between layers to prevent sticking.
- Refrigeration: Store in an airtight container for up to 1 week. Note that refrigeration can firm the bars and the chocolate top may show condensation when brought back to room temperature.
- Freezer: Wrap squares individually in plastic wrap and freeze in a sealed container for up to 2–3 months. Thaw at room temperature before serving.
Pro Tips & Tricks
- Best peanut butter: Use a creamy, well-stirred natural peanut butter for pure peanut taste, or a commercial smooth peanut butter for a sweeter, more stable texture. Both work; adjust salt to taste.
- Marshmallow doneness cue: When marshmallows are fully melted and the mixture is glossy (no visible chunks), you’re ready to fold in the cereal. Residual heat will keep it liquid long enough to mix.
- Chocolate finish: Tempering isn’t required; simply melt and spread. For a shinier finish, stir a small teaspoon of vegetable oil into the melted chocolate before spreading.
- Prevent sticking: Line your pan with parchment paper with an overhang so you can lift the whole slab out for easier slicing.
- Achieve even squares: Chill the set slab for 10–15 minutes, then use a long, hot knife (run under hot water and dry) to slice cleanly.
Creative Twists
- Vegan & nut-free: Use sunflower seed butter (or tahini) + vegan marshmallows + dairy-free chocolate chips for a nut-free vegan bar.
- S’mores style: Add 1/2 cup crushed graham crackers into the cereal mix and sprinkle extra mini marshmallows and graham cracker crumbs on top of the melted chocolate.
- Salted caramel crunch: Drizzle warm caramel sauce over the chocolate top and finish with flaky sea salt and toasted pecans.
- Peanut butter swirl: Reserve 2 tablespoons of peanut butter; warm and drizzle over the chocolate top in a swirl pattern for a marbled finish.
- Extra protein boost: Stir in 1/4–1/2 cup protein powder (vanilla or unflavored) into the melted marshmallow mix for an on-the-go snack with more staying power.
Frequently Asked Questions
Q: Can I make these without marshmallows?
A: Marshmallows act as the binder. If you don’t have marshmallows, you can use 1/4 cup corn syrup plus an extra 2–3 tablespoons butter and heat to coat the cereal, but texture and flavor will differ.
Q: My bars are too crumbly — what went wrong?
A: Likely not enough binder; ensure your marshmallows were fully melted and you pressed the mixture firmly into the pan while still warm.
Q: Can I use crunchy peanut butter?
A: Yes — the extra nut pieces add texture. If you prefer smoother bars, use creamy peanut butter.
Q: How do I prevent the chocolate top from cracking when I cut?
A: Chill just until the chocolate is set but still slightly soft, then cut with a warm, clean knife. Allow the bars to return to room temperature before serving for best texture.
Q: Any healthier swaps?
A: Try reduced-sugar cereal, natural peanut butter with no added sugar, and dark chocolate with 70% cocoa to reduce added sugars. Keep in mind caloric density remains relatively high due to nut butter and chocolate.
Conclusion
If you want another take on peanut-butter-forward cereal bars, this Peanut Butter Rice Krispies Treats recipe from The Country Cook offers a classic, well-loved approach that complements the method above. For inspiration on pairing vivid peanut-chocolate flavors in more decadent desserts, see this version of Peanut Butter Rice Krispie Treats from Just so Tasty.
I hope you enjoy making these — please try the recipe, snap a photo of your batch, and share your variations with the community. Happy baking!