EASY TACO CUPS
There’s something unexpectedly joyful about the moment you lift a warm, cheesy taco cup to your lips — the crisped tortilla shell cracks softly, releasing the heady aroma of browned beef, toasted corn, and melted cheddar; a bright kiss of tomato and spices follows, then the satisfying chew of beans and tender onion. These small, handheld bites wake up your senses: savory, slightly smoky, with a textural play between crunchy shell and gooey filling.
Whether you’re chasing a quick weeknight win, feeding a hungry crowd at a casual party, or making a playful snack for a cozy movie night, these Easy Taco Cups deliver comfort and celebration in each bite. They’re fast enough for busy evenings and festive enough for weekend gatherings — and if you like variations, check this baked take on the idea for more inspiration: baked taco cups recipe.
Recipe Details
- Prep Time: 15 minutes
- Cook Time: 20–25 minutes (including an initial shell bake and final melt)
- Total Time: ~40 minutes
- Servings: 8 taco cups (one cup per person)
- Difficulty Level: Easy — great for beginners and busy cooks
Nutrition Highlights
Nutrition per serving (one taco cup) — approximate values:
- Calories: 440 kcal
- Protein: 22 g
- Carbohydrates: 29 g
- Fat: 23 g
- Fiber: ~5 g
- Sodium: variable depending on taco seasoning and tortilla brand
These estimates were calculated using nutrient values from government food-composition databases (USDA FoodData Central) and reflect typical packaged and raw ingredient profiles. For personalized dietary needs or precise tracking, please use a nutrition calculator with your exact ingredient brands and portion sizes. Reputable resources for general nutrition guidance include the Mayo Clinic and the U.S. Department of Agriculture.
Perfect For…
These taco cups are perfect when you want maximum flavor with minimal fuss. They shine for:
- Casual gatherings and game nights (easy to pick up and eat)
- Quick family dinners on busy weekdays
- Kid-friendly lunches or party platters
- Weekend brunches when you want a savory twist on handhelds
Beyond convenience, they encourage sharing and conversation — every cup is a small, celebratory portion that invites smiles.
Preparation Guide
Ingredients
- Ground beef: 450 g
- Small flour tortillas: 8 tortillas, cut into rounds
- Onion: 1 medium, finely chopped
- Garlic: 2 cloves, minced
- Taco seasoning: 2 tablespoons
- Tomato sauce: 120 ml
- Shredded cheddar cheese: 150 g
- Canned corn: 120 g, drained
- Canned black beans: 120 g, rinsed and drained
- Olive oil: 1 tablespoon
Optional ingredients and substitutions
- Use ground turkey or shredded chicken instead of beef for a lighter protein.
- For a vegetarian version, substitute the beef with 400 g seasoned crumbled tofu or extra black beans and mushrooms.
- Swap flour tortillas for small corn tortillas to reduce gluten (ensure they are flexible for shaping).
- Try pepper jack or a Mexican blend cheese for extra heat and complexity.
- Add chopped jalapeño, chopped cilantro, or a squeeze of lime for a fresh lift.
Method — step-by-step
- Preheat the oven to 190°C (375°F).
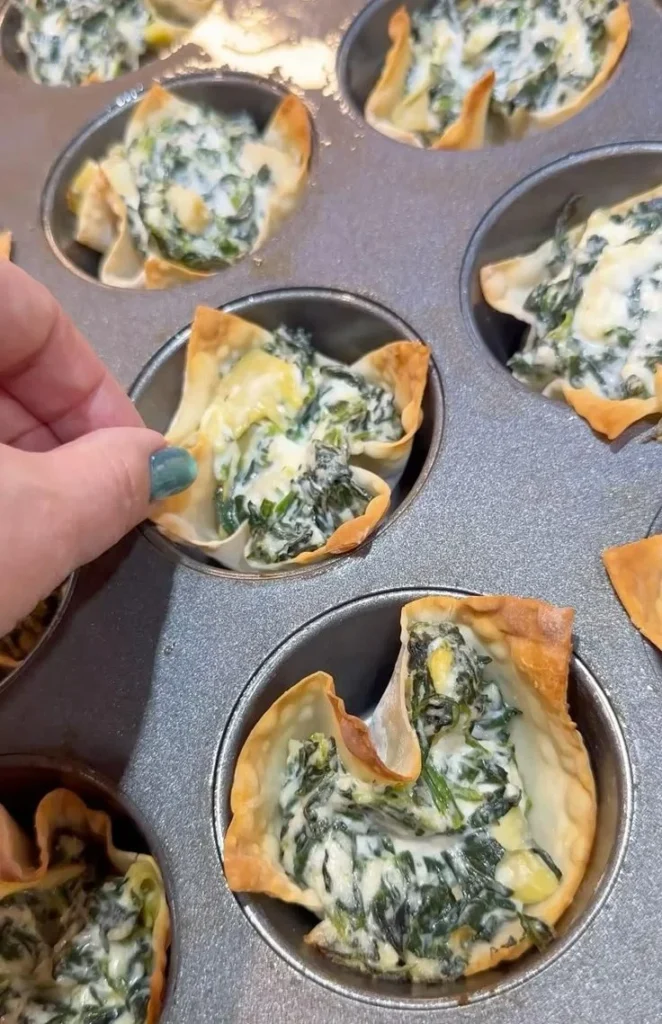
- Press the tortilla rounds gently into the wells of a muffin tin to form small cups. Make sure they’re shaped snugly to the sides.
- Bake the tortilla shells for 8 minutes until lightly golden and crisp. Remove and set aside.
- Heat olive oil in a skillet over medium heat and sauté the chopped onion and minced garlic until soft and fragrant, about 3–4 minutes.
- Add the ground beef and cook until browned, breaking it up as it cooks — about 6–8 minutes. Drain excess fat if preferred.
- Stir in the taco seasoning and tomato sauce, mixing well to coat the beef evenly. Cook for 2 minutes more so flavors meld.
- Add the corn and black beans, then cook for 2 to 3 minutes until heated through. Adjust seasoning with salt and pepper to taste.
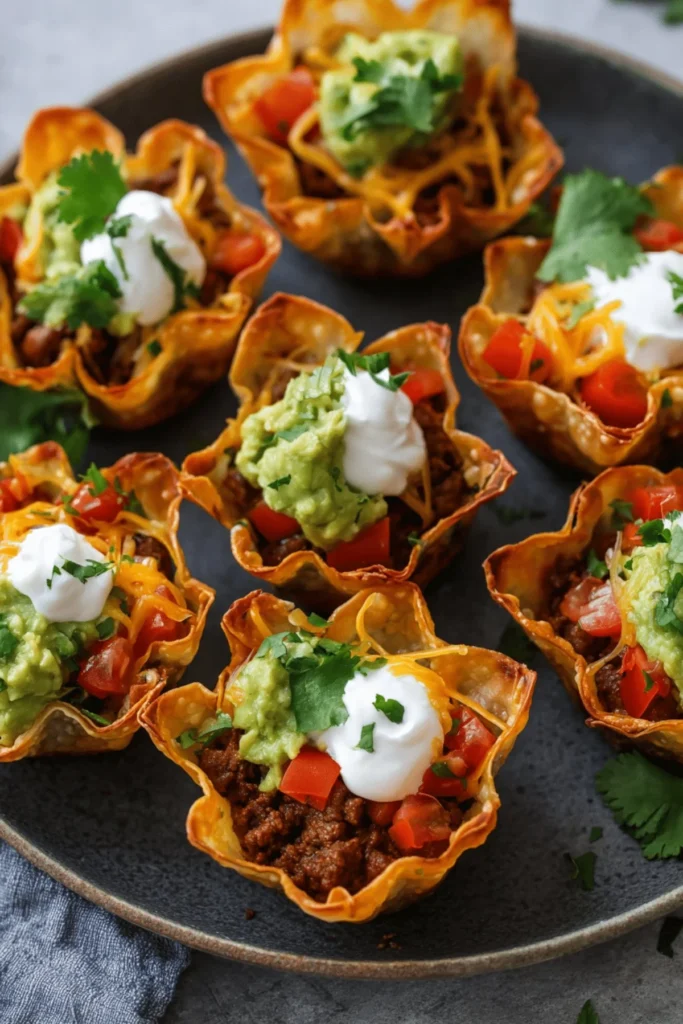
- Spoon the beef mixture into the baked tortilla cups, filling each to just below the rim.
- Sprinkle shredded cheddar cheese evenly over the filled cups.
- Bake for 10 to 12 minutes until the cheese is fully melted and bubbly. Let cool slightly before removing from the muffin tin.
Practical tips
- Don’t overfill the cups — leave room for cheese to melt without spilling.
- If tortillas crack while shaping, dampen them with a light spray of water and reshape, or layer two thinner rounds.
- To make ahead: assemble up to step 8, cover, refrigerate, and bake (step 10) when ready.
Serving Suggestions
Serve It Up
- Classic: Serve warm with a spoonful of sour cream, chopped cilantro, and lime wedges.
- Fresh and bright: Top with pico de gallo, sliced avocado, or a dollop of guacamole.
- Crunchy contrast: Add pickled red onions or thinly sliced radish for brightness.
- On the side: Pair with tortilla chips and a simple salad or black bean salsa for a fuller spread.
- For brunch: Offer alongside scrambled eggs and coffee for a savory morning twist.
If you’re exploring other taco-style bowls and bowls with seasonal vegetables, try pairing flavors inspired by this sweet potato taco bowl for a complementary vegetable-forward option: sweet potato taco bowl recipe.
Keeping it Fresh
- Room temperature: Do not leave assembled, perishable taco cups at room temperature for more than 2 hours (per food safety guidelines).
- Refrigeration: Store cooled taco cups in an airtight container in the refrigerator for up to 3–4 days. Reheat in a preheated oven at 175°C (350°F) for 8–10 minutes to restore crispness.
- Freezer: Freeze fully cooled, assembled (or just filling) in airtight, freezer-safe containers for up to 2 months. Reheat from frozen in a 175°C (350°F) oven for 20–25 minutes or until heated through. Note: tortilla shells may soften slightly after freezing and reheating.
Pro Tips & Tricks
- Shell crispness: A quick bake before filling removes moisture and guarantees a crunchy cup that won’t go soggy when filled.
- Balance moisture: If your filling seems too wet, simmer it a few extra minutes uncovered to reduce excess liquid — this keeps shells crisp.
- Cheese melt: Grate your own cheese when possible; pre-shredded cheeses often contain anti-caking agents that slightly alter melt quality.
- Seasoning control: Start with 1–1.5 tbsp taco seasoning, then taste and add more if you like stronger spice — store-bought mixes vary widely in salt content.
- Crowd-proofing: Keep filling and toppings separate on a buffet so guests can customize; that way shells stay crisp until eaten.
Creative Twists
- Vegetarian Fiesta: Replace beef with a mix of finely chopped mushrooms and crumbled firm tofu, seasoned well — add extra smoked paprika and cumin to mimic beefy depth.
- BBQ Pulled Beef Cups: Use leftover pulled beef tossed in barbecue sauce, top with slaw instead of cheese for a Southern-meets-Mexican mashup.
- Breakfast Taco Cups: Swap the filling for scrambled eggs, breakfast sausage, and cheddar; top with salsa for a morning-friendly variation.
- Gluten-free option: Use small corn tortillas that are softened briefly before shaping (steam 10–15 seconds in the microwave between damp paper towels), then bake as instructed.
All Your Questions Answered
Q: Can I use corn tortillas instead of flour?
A: Yes — corn tortillas work fine but can be less pliable. Warm them briefly (steam or microwave wrapped in a damp towel) before shaping to reduce cracking.
Q: How can I keep the shells from going soggy?
A: Pre-bake shells until lightly golden, keep filling fairly dry (simmer to reduce excess liquid), and add toppings like sour cream or guacamole just before serving.
Q: Is it safe to freeze assembled taco cups?
A: You can freeze them but expect some texture change in the tortilla. For best results, freeze filling separately and bake fresh shells when reheating.
Q: What’s a lighter version I can make?
A: Use lean ground turkey or extra beans and vegetables, reduce cheese, and use corn tortillas for a slightly lighter cup.
Q: How do I scale this recipe for a party?
A: Multiply ingredients proportionally; use multiple muffin tins and bake in batches, keeping finished cups warm in a low oven (about 120°C / 250°F) on a rack so bottoms stay crisp.
Conclusion
There’s real joy in turning familiar taco flavors into these portable, shareable cups — quick to assemble, endlessly adaptable, and always crowd-pleasing. Give the recipe a try, then experiment with the variations and swaps that suit your pantry and guests. If you enjoyed this take, you might like the crunchy spin in Kevin & Amanda’s version for additional ideas: Kevin & Amanda’s crunchy taco cups recipe, or the beef-and-cheese approach at Dinner at the Zoo for another perspective on presentation and assembly: Taco Cups with Beef and Cheese.
Share your photos and tips — I’d love to see how you customize yours!