Beef and Cheese Chimichangas
Introduction
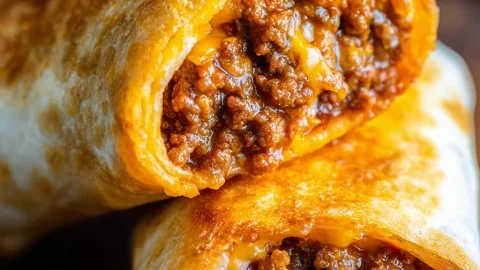
There’s something irresistible about the whisper of hot oil, the scent of browned beef and toasted tortillas, and the first bite that splits to reveal molten cheese and seasoned filling. These beef and cheese chimichangas deliver all of that: a crunchy shell that yields to a warm, gooey heart of seasoned beef, refried beans, and sharp cheddar. The texture contrast—crispy exterior, tender meat, creamy beans and strings of cheese—keeps you reaching for just one more.
This recipe is perfect for lively weekend gatherings, casual weeknight dinners, game-day spreads, or even as a make-ahead option for busy nights. They’re filling and crowd-pleasing, yet simple to scale up. If you love comfort-food hybrids—think burrito meets fried perfection—you’ll also appreciate this alongside other oven-friendly favorites like my take on a best mac and cheese meatloaf casserole for a full, satisfying menu.
Dish Snapshot
- Prep Time: 15 minutes
- Cook Time: 15–20 minutes (plus 18–20 minutes baking if using oven method)
- Total Time: 35–45 minutes (depending on chosen cooking method)
- Servings: 6 chimichangas
- Difficulty Level: Easy–Intermediate
Nutrition Highlights
Estimated nutrition per serving (1 chimichanga). These values are estimates calculated from standard ingredient databases (USDA FoodData Central averages) and interpreted using dietary guidance from reputable sources such as the USDA and Mayo Clinic. Actual values vary by specific brands and preparation choices.
- Calories: ~630 kcal
- Protein: ~28 g
- Carbohydrates: ~60 g
- Fat: ~34 g
- Saturated Fat: ~14 g
- Fiber: ~6 g
- Sodium: ~950 mg
Notes: This dish is energy-dense because of the cheese, tortillas, and ground beef—great for hearty appetites. To reduce calories, use leaner beef, lower-fat cheese, or the oven-baked method with a light spray of oil. For sodium-sensitive diets, choose low-sodium refried beans, salsa, and mild taco seasoning.
Why You’ll Love It
- Flavor & Aroma: A toasty, savory aroma fills the kitchen when the beef, onions, and garlic hit the pan. The spice of taco seasoning balanced with bright salsa keeps the flavor lively.
- Comfort Factor: Crispy on the outside and indulgently cheesy inside—these chimichangas tap into classic comfort-food nostalgia, great for family meals or sharing with friends.
- Speed & Ease: From stovetop to table in under an hour, with simple ingredients and straightforward assembly.
- Versatility: Easy to adapt—go lighter, spicier, vegetarian, or gluten-free without losing the essence of the recipe.
Step-by-Step Instructions
Ingredients
- 1 lb (450 g) ground beef (80–85% lean recommended for flavor)
- 1 small onion, finely diced
- 2 cloves garlic, minced
- 1 packet (1 oz / 28 g) taco seasoning (or 1–2 tbsp homemade blend)
- 1/2 cup (120 ml) salsa
- 1 cup (240 g) refried beans
- 1 1/2 cups (about 170 g) shredded cheddar cheese or Mexican blend
- 6 large flour tortillas (burrito-size)
- 2 tbsp vegetable oil (for brushing or shallow frying)
Optional ingredients and substitutions
- Swap ground beef for ground turkey or plant-based crumbles for lower fat or vegetarian options.
- Use low-fat or reduced-sodium refried beans and cheese to cut calories and sodium.
- Add 1/2 cup chopped green chiles, corn kernels, or black beans for extra texture and flavor.
- For gluten-free chimichangas, use large gluten-free tortillas or corn tortillas (corn versions are smaller—plan accordingly).
- Seasoning swap: replace taco seasoning with chili powder, cumin, smoked paprika, and a pinch of cayenne to taste.
Preparation
-
Cook the beef filling:
- Heat a large skillet over medium heat. Add the ground beef and diced onion.
- Cook, breaking up the beef with a spoon, until the meat is browned and the onion is tender (about 6–8 minutes).
- Drain excess grease from the pan.
- Return to heat, stir in the minced garlic, taco seasoning, and salsa. Reduce heat and simmer 3–4 minutes until fragrant and well combined. Remove from heat.
-
Assemble the chimichangas:
- Lay a tortilla flat. Spread about 2 tablespoons of refried beans down the center.
- Spoon about 1/6 of the beef mixture on top of the beans.
- Add a handful (about 1/4 cup) of shredded cheese over the beef.
- Fold the sides of the tortilla in, then roll tightly from the bottom to form a sealed burrito. Repeat with remaining tortillas and filling.
- Place each chimichanga seam-side down on a plate or tray.
-
Cook the chimichangas (choose one method):
- Oven method (healthier):
• Preheat oven to 400°F (200°C).
• Place chimichangas seam-side down on a baking sheet lined with parchment.
• Lightly brush or spray each chimichanga with vegetable oil.
• Bake 18–20 minutes, flipping once halfway through, until golden and crisp. - Skillet method (crispier):
• Heat 2–3 tablespoons of oil in a heavy skillet over medium heat.
• Place chimichangas seam-side down and fry 2–3 minutes per side until golden brown and crisp (about 6–8 minutes total). Adjust heat to avoid burning.
• Transfer to paper towels briefly to drain excess oil.
- Oven method (healthier):
-
Serve:
- Remove from heat and let chimichangas rest 1–2 minutes before serving.
- Top with sour cream, guacamole, shredded lettuce, pico de gallo, or extra salsa as desired.
Practical tips
- Avoid overfilling tortillas—too much filling prevents a tight roll and may burst during cooking.
- If tortillas crack when rolling, warm them briefly in the microwave (10–15 seconds) to make them pliable.
- For even crisping in the oven, spray oil on both sides and flip halfway.
- Check doneness by looking for a golden exterior and melted cheese; if using a thermometer, internal temp for beef filling should be 160°F (71°C).
Best Pairings
- Classic sides: Mexican rice, cilantro-lime slaw, or a simple green salad.
- Sauces: Serve with warmed salsa verde, pico de gallo, or a smoky chipotle crema.
- Drinks: Bright beers, margaritas, or iced tea balance the richness.
- Brunch twist: Pair a chimichanga with fresh fruit and a light coffee—think about complementing savory richness with the sweet-and-tart flavors of a brie pear grilled cheese sandwich on the side for indulgent brunch gatherings.
Storage Instructions
- Room temperature: Chimichangas are safe at room temperature for up to 2 hours (USDA guidelines); do not leave longer.
- Refrigerator: Store cooled chimichangas in an airtight container for 3–4 days.
- Freezer: Wrap each chimichanga tightly in plastic wrap and place in a freezer bag; freeze up to 2 months. To reheat from frozen, bake at 375°F (190°C) for 25–30 minutes until heated through and crisp.
- Reheating tip: For best texture, reheat in a 375°F oven for 10–12 minutes (from refrigerated) or use an air fryer at 350°F for 6–8 minutes.
Chef’s Advice
- Cheese choice matters: A sharper cheddar or a Mexican blend (with Monterey Jack) provides great melt and flavor—avoid pre-shredded cheese if possible (it contains anti-caking agents that can reduce meltiness).
- Use the oven when cooking many chimichangas at once so you can crisp them evenly without crowding a skillet.
- To control oiliness, drain the cooked beef well or blot the seam-side with a paper towel before frying.
- Crispy but not greasy: Bake first at 400°F, then finish with a quick 1–2 minute skillet sear for crispness.
- Flavor layering: Season beans lightly with salt and lime for brightness; mix a tablespoon of chopped cilantro into the beef for fresh notes.
Creative Twists
- Vegetarian version: Substitute cooked lentils, crumbled tempeh, or sautéed mushrooms for the ground beef; add smoked paprika and a splash of soy sauce for umami.
- Breakfast chimichanga: Add scrambled eggs, breakfast sausage, potatoes, and pepper jack cheese—serve with salsa and hot sauce.
- Green chile & corn: Mix roasted green chiles and fresh corn kernels into the beef for a sweet-and-smoky variation.
- Gluten-free option: Use large gluten-free flour tortillas or corn tortillas (note: smaller size may require more tortillas or a bigger filling-to-tortilla ratio).
- Lighter option: Use 93% lean ground turkey, reduced-fat cheese, and bake with a light oil spray.
All Your Questions Answered
Q: Can I use pre-cooked rotisserie chicken instead of beef?
A: Yes. Shred the chicken, mix with taco seasoning and salsa, and proceed with assembly; reduce cook time slightly since the chicken is already cooked.
Q: My chimichangas are soggy—how do I fix that?
A: Ensure tortillas are dry and not overfilled. For crispness, bake at 400°F with a light oil spray and finish in a hot skillet or air fryer for 1–2 minutes per side.
Q: Are chimichangas safe to make ahead and freeze?
A: Absolutely—assemble, then wrap individually and freeze up to 2 months. Bake from frozen at 375°F until heated through.
Q: How can I reduce calories and sodium?
A: Use leaner meat or a plant-based substitute, lower-sodium beans and salsa, reduced-fat cheese, and the oven method rather than frying.
Q: What’s a good dipping sauce for kids?
A: Mild salsa, sour cream, or a blended avocado crema (avocado, lime, low-sodium yogurt) work well.
Conclusion
Whether you choose the crisp skillet route or the lighter oven-baked approach, these beef and cheese chimichangas are a reliably delicious crowd-pleaser—crispy, cheesy, and full of savory comfort. If you’d like to compare variations or see other cooks’ takes, check out this classic recipe inspiration on Beef and Cheese Chimichangas – Sweet Pea’s Kitchen and another flavorful version at Beef Chimichangas Recipe – Spicy Southern Kitchen.
Give this recipe a try, leave a comment about the twist you loved, and share photos—let’s build a community of home cooks who celebrate crispy, comforting food.