Garlic Herb Dutch Oven Bread Recipe You’ll Love Today!
Introduction
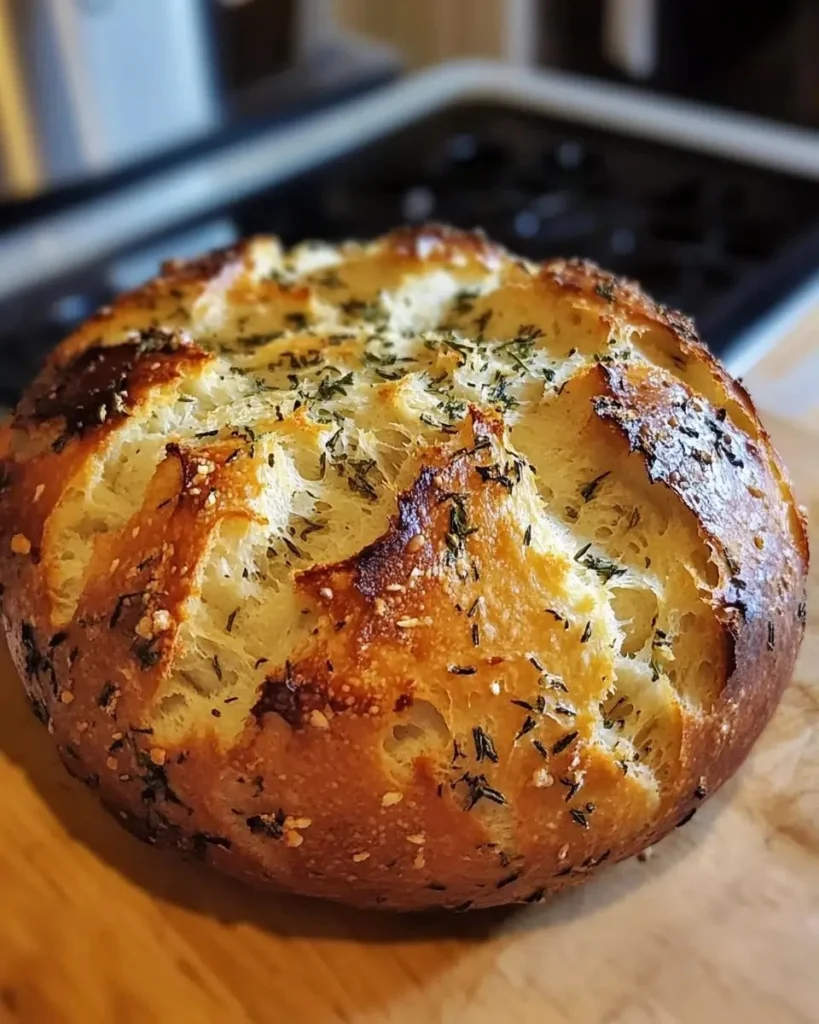
The moment this garlic herb Dutch oven bread emerges from the oven, your kitchen becomes a warm, aromatic haven: a crisp, golden crust crackling under your fingers, a tender, pillowy crumb that yields effortlessly, and an immediate rush of roasted garlic and bright rosemary-thyme notes that make you want to slice straight through. The first bite—warm, slightly chewy center flecked with herby green, finished by a whisper of sea salt—feels like a comforting hug in loaf form.
This recipe is perfect for cozy weekend mornings with coffee, impromptu dinner parties where the bread steals the show, or as a simple centerpiece for holiday gatherings. It’s forgiving, low-lift (no kneading required), and reliably impressive. For a printable version or step-by-step photos that complement this post, see the full recipe page and photos.
At a Glance
- Prep Time: 15 minutes active (plus 12–18 hours for the overnight rise)
- Cook Time: 45–50 minutes
- Total Time: 12–18 hours (mostly hands-off)
- Servings: 8 (one large loaf; adjust slice size to serve more/less)
- Difficulty Level: Easy — great for home bakers of all levels
Nutrition Highlights
Nutrition per serving (estimate, based on 8 servings per loaf):
- Calories: ~180 kcal
- Protein: ~4.6 g
- Carbohydrates: ~35 g
- Fat: ~2.1 g
- Fiber: ~1.4 g
- Sodium: ~575 mg
Notes on accuracy and sources: these values are estimates calculated from standard ingredient nutrient profiles (primarily USDA FoodData Central). Sodium is influenced heavily by the 2 teaspoons of salt in the whole loaf; the CDC recommends limiting daily sodium to 2,300 mg for most adults, so a single slice contributes a meaningful portion of that allowance. Use these numbers as guidance—exact values will vary with brands, flour types, and portion sizes.
Why You’ll Love It
- Aroma and taste: Roasted garlic and fresh herbs perfume the crumb and crust, making the loaf irresistible warm from the oven.
- Ease and rhythm: The no-knead, long-fermentation method makes this an ideal “set-it-and-forget-it” weekend bake that rewards patience with depth of flavor.
- Social and seasonal: It’s a showstopper for dinner guests, perfect for charcuterie boards, and cozy enough for rainy-day baking. It also pairs beautifully with soups, stews, and holiday spreads.
- Flexible & forgiving: Swap herbs or add inclusions (see variations) without compromising texture.
Step-by-Step Instructions
Ingredients
- 3 cups all-purpose flour, plus extra for dusting (about 360 g)
- 2 teaspoons fine sea salt
- 1/2 teaspoon instant yeast
- 1 1/2 cups lukewarm water (90–100°F / 32–38°C)
- 4 cloves garlic, minced finely or pressed (about 12 g)
- 2 tablespoons fresh herbs (rosemary, thyme, or a combination), chopped finely
- 1 tablespoon olive oil, for coating
Optional ingredients and substitutions:
- 1–2 tablespoons grated Parmesan or Pecorino (stir into dough or sprinkle on top before baking)
- Replace up to 1 cup of all-purpose flour with whole wheat flour for a nuttier flavor (expect denser crumb)
- For a dairy-free or vegan loaf: recipe is already vegan-friendly; just avoid cheese add-ins
- For gluten-free: use a tested 1:1 gluten-free flour blend and xanthan gum as per blend instructions (results vary)
Method
- In a large mixing bowl, whisk together the flour, salt, and instant yeast until evenly distributed. Stir in the minced garlic and chopped herbs so they’re dispersed throughout the dry mix.
- Pour in the lukewarm water and stir with a wooden spoon or spatula until no dry flour remains. The dough will look sticky and rough — this is correct.
- Cover the bowl tightly with plastic wrap or a damp towel. Let rise at room temperature for 12 to 18 hours, until doubled in size and dotted with bubbles. Overnight works great.
- Generously flour a work surface and your hands. Gently scrape the sticky dough onto the surface. With floured hands, fold the outer edges toward the center a few times to create a loose round shape, handling it gently to preserve gas pockets.
- Place the shaped dough on a sheet of oiled parchment paper (this will act as a sling). Cover loosely with a towel and let rest for 45 minutes to 1 hour; it should puff slightly.
- Place a Dutch oven (with its lid) in your oven and preheat to 450°F (230°C) for 30 minutes — the pot must be very hot.
- Carefully remove the hot Dutch oven from the oven. Using the parchment as a sling, lower the dough into the pot. Score the top with a sharp knife or lame (one long slash or decorative cuts).
- Cover with lid and bake for 30 minutes. Remove the lid and bake uncovered for another 15–20 minutes until the crust is deep golden brown and the loaf sounds hollow when tapped on the bottom.
- Remove the bread from the Dutch oven and transfer to a wire rack. Cool for at least 30 minutes before slicing to allow the crumb to set.
Practical tips:
- Avoid overmixing after adding water — the sticky, shaggy look is normal and desirable.
- If your oven runs hot or cold, use an oven thermometer to ensure accurate baking temperature.
- Check doneness by tapping the bottom of the loaf; a hollow sound indicates it’s baked through. Internal temperature should be ~200–210°F (93–99°C) for fully baked bread.
- If worried about salt levels, reduce salt to 1 1/2 teaspoons, but expect slightly milder flavor.
Best Pairings
- Simple: Slather with high-quality butter and flaky sea salt.
- Savory: Serve alongside tomato basil soup, roasted vegetable stew, or a hearty minestrone.
- Brunch: Split and toast lightly, add scrambled eggs or melted cheese.
- Appetizer: Use thick slices on a charcuterie board with olives, cured meats, and tapenades.
- Coffee/Tea: A warm slice pairs wonderfully with morning coffee or an herbal tea.
If you love baking loaves, try a sweeter loaf for variety—like the banana bread caramel swirl—to offer guests both savory and sweet house-made options.
Keeping it Fresh
- Room temperature: Store in a paper bag or loosely wrapped in a clean kitchen towel for 2 days to preserve crust texture. Avoid plastic if you want to keep crust crisp — it’ll soften the crust but keep the interior moist.
- Refrigeration: Not recommended for storing bread long-term; it accelerates staling. If you must, wrap tightly and refrigerate up to 3 days, then refresh in a hot oven for 5–7 minutes before serving.
- Freezer: Slice first, wrap tightly in plastic or foil, then place in a freezer bag. Freeze up to 3 months. Reheat from frozen in a 350°F oven for 10–15 minutes or thaw at room temperature and refresh in the oven.
Chef’s Advice
- Use ripe, fresh herbs for the brightest aroma. If using dried herbs, use about 1 teaspoon total, but fresh is preferred.
- A heavy cast-iron Dutch oven gives the best oven spring and crisp crust because it traps steam; if using enamel, make sure it’s safe for high heat.
- For extra flavor complexity, roast the garlic first (with a little oil) and fold in soft roasted cloves—this produces a sweeter, milder garlic note.
- Score confidently: a clean, single slash encourages a dramatic ear (controlled rise) on the loaf. Use a very sharp blade.
- Timing note: If your pantry is particularly warm, shorten the bulk rise to avoid over-fermentation; if cool, extend it.
Creative Twists
- Cheesy Herb: Add 1 cup grated sharp cheddar or Parmesan and an extra 1/2 teaspoon salt for a savory, melty twist.
- Olive & Sundried Tomato: Fold in 1/2 cup chopped olives and 1/3 cup chopped sundried tomatoes (drained and patted dry) for a Mediterranean loaf.
- Whole Grain: Substitute 1 cup of all-purpose flour with whole wheat or spelt flour; add 1–2 tablespoons extra water if the dough feels dry.
- Garlic Butter Finish: Brush the hot loaf with a little garlic-infused olive oil or melted butter and sprinkle with flaky sea salt for a glossy, flavored crust.
- Gluten-Free Option: Use a properly balanced gluten-free 1:1 flour blend and follow the manufacturer’s hydration guidance; expect differences in crumb and baking time.
Frequently Asked Questions
Q: Can I shorten the 12–18 hour rise period?
A: The long rise develops flavor and structure. You can shorten to 8–10 hours in a warmer environment, but expect milder flavor and less open crumb.
Q: My dough is very sticky—am I doing it right?
A: Yes. This recipe is intentionally wet. Flour only as needed for shaping; too much flour will make the loaf dense.
Q: How can I make the crust extra-crispy?
A: Bake on the heavier side of the time range uncovered, and allow the bread to sit on a wire rack to cool uncovered so moisture dissipates from the crust.
Q: Can I use active dry yeast instead of instant?
A: Yes. If using active dry yeast, proof it in the lukewarm water for 5–10 minutes until foamy before adding to the flour mixture.
Q: Is this recipe suitable for vegans?
A: Yes—the base recipe contains no animal products. If you add cheese or butter as a topping, choose vegan alternatives to keep it vegan-friendly.
Conclusion
Make this garlic herb Dutch oven bread when you want a low-effort loaf that fills the house with unforgettable aroma and delivers a warm, comforting slice every time. If you’d like a faster rosemary-garlic variation that uses a shortened method, check out Rosemary Garlic No-Knead Bread, the Two Hour Method. For inspiration on adding cheese and a sourdough twist, see Italian Herb & Cheese Sourdough Bread – The Pantry Mama.
If you try this loaf, please share your photos and notes in the comments—I love hearing how your crust and crumb turned out, what herb combos you used, and any personal spins you added. Happy baking!