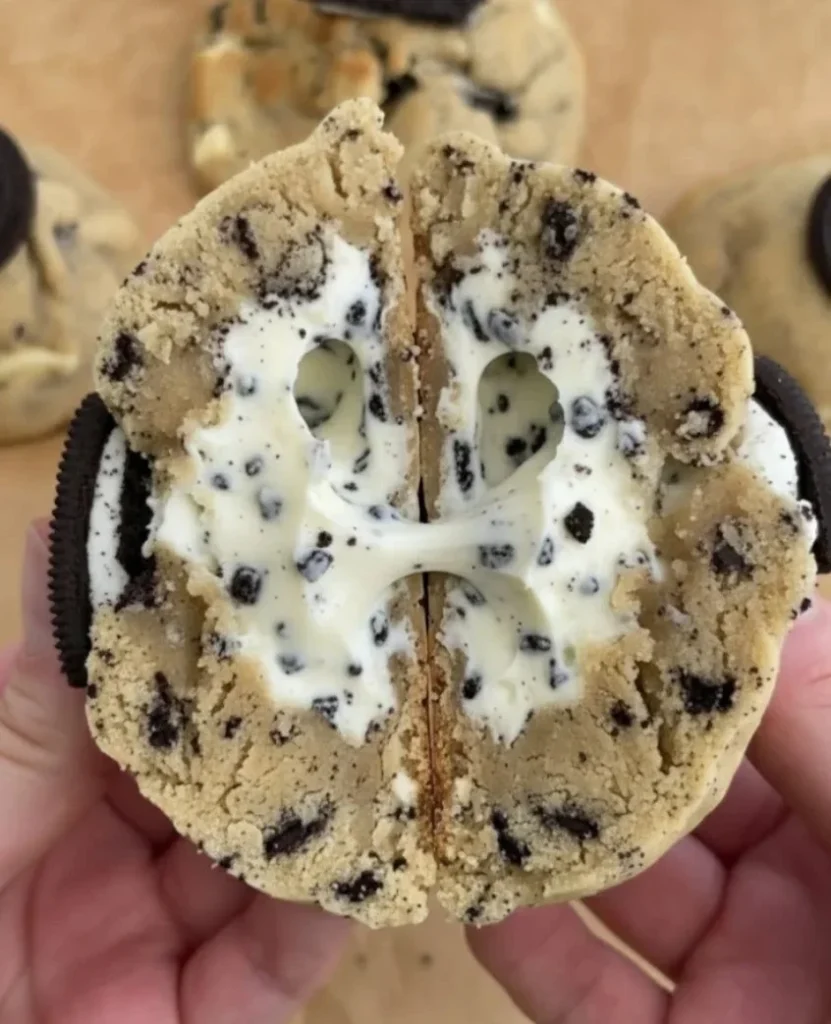
Gooey OREO NYC Cookies
There’s something instantly nostalgic about the smell of butter and sugar caramelizing at the edges of a warm cookie — that first puff of vanilla-sweet steam, the soft give of a freshly baked center, and the crackle of a crisp chocolate wafer pressed into warm dough. These Gooey OREO NYC Cookies are exactly that kind of indulgence: molten, pillowy cookies with a molten cookies-and-cream heart and an Oreo crown. One bite is a contrast of silky spread, white chocolate sweetness, crumbly Oreos and tender cookie — a dessert that feels like a hug.
This recipe is perfect for weekend baking sessions, late-night dessert cravings, and small gatherings when you want an impressive treat without fuss. If you enjoy experimenting with cookie textures, you might also like this almond-flour chocolate-chip alternative I sometimes test for lighter options: almond flour chocolate chip cookies.
Dish Snapshot
- Prep Time: 20 minutes active (plus freezing time)
- Cook Time: 8–10 minutes per tray
- Total Time: ~3 hours (including chilling/freezing steps and cooling)
- Servings: 8 large cookies
- Difficulty Level: Medium — simple technique, but the freezing steps are key
Nutrition Highlights
Estimated nutrition per cookie (1 of 8). These values are rounded estimates calculated using standard food composition values from USDA FoodData Central and represent an indulgent, high-calorie cookie. Use them as a guide rather than an exact laboratory number.
Per cookie (approximate)
- Calories: 825 kcal
- Protein: 8.8 g
- Carbohydrates: 110 g
- Sugars (estimated): 65–75 g
- Fiber: ~2 g
- Fat: 38.8 g
- Saturated fat: ~15–20 g
- Sodium: variable (depends on margarine/salt in ingredients)
Notes on nutrition: these cookies are a rich treat — high in calories, sugars and fat. If you track specific nutrients closely, consider halving portions or sharing. Nutritional estimates were derived from USDA FoodData Central nutrient profiles for common ingredients (margarine, sugar, all-purpose flour, white chocolate, commercial cookie spread and sandwich cookies).
Why You’ll Love It
- Flavor & Texture: This cookie is about dramatic contrasts — a crisp exterior giving way to a pillowy center, a creamy cookies-and-cream flood in the middle and the familiar crunch of an Oreo on top. The white chocolate chips add little pockets of mellow sweetness that balance the cocoa of the Oreos.
- Social & Memory Factor: These are crowd-pleasers for parties, movie nights, bake sales or afternoon tea. The show-stopping presentation (a half-Oreo pressed into each cookie) makes them feel special and shareable.
- Ease & Reliability: There’s nothing technically exotic here — the recipe uses pantry staples and straightforward methods. The only real “trick” is freezing the stuffed cookies so they bake tall and gooey instead of spreading thin.
How to Make Gooey OREO NYC Cookies
Ingredients
- 125 g margarine (softened)
- 100 g light brown sugar
- 50 g caster (granulated) sugar
- 1 tsp vanilla extract
- 1 large egg
- 310 g plain (all-purpose) flour, sifted
- 1½ tsp baking powder
- ½ tsp bicarbonate of soda (baking soda)
- 100 g white chocolate chips
- 1 jar (approx. 350 g) Cookies and Cream Spread (store-bought; see notes below)
- 2 × packs of Oreos (154 g each) — total 308 g
Optional ingredients & substitutions: - Butter in place of margarine (same weight) for a more buttery flavor.
- Use dairy-free margarine and dairy-free white chocolate for a vegan-ish version (see Variations).
- Swap half the plain flour for bread flour for chewier cookies.
- Reduce sugars by 25% for a slightly less sweet cookie (will change texture slightly).
Step-by-step Instructions
- Take out a medium-sized plate and place a piece of baking paper on top. Using a spoon, scoop 8 even balls of Cookies and Cream Spread onto the plate (about the size of a ping-pong ball each). Freeze these balls until needed — they should be solid but still slightly pliable when you stuff the cookies.
- Move on to the cookie dough. In a mixing bowl, add the margarine, light brown sugar and caster sugar. Combine the sugars and margarine by hand or with an electric mixer until smooth and well blended.
- Add the vanilla extract and mix to combine.
- Add the egg and mix again until incorporated. It may look a little curdled at this point — that’s okay.
- Pour in the sifted flour, baking powder and bicarbonate of soda. Mix until a soft dough forms. The dough should come together and be easy to pick up; it should not be overly sticky. If it’s too sticky, add a tablespoon or two of flour.
- Fold in the white chocolate chips and 4 chopped Oreos (reserve remaining Oreos for stuffing/topping). Mix until distributed evenly.
- Retrieve the frozen spread balls from the freezer.
- Portion the cookie dough into 8 equal balls. Flatten each ball into a disc in your palm.
- Place one frozen spread ball in the center of each flattened cookie disc, then add 1 whole Oreo on top of the spread. Repeat for all cookies.
- Carefully shape the dough back into tight balls, ensuring the filling and Oreo are fully enclosed by dough.
- Freeze your stuffed cookie balls for 45 minutes. This is essential for thick, gooey cookies — the frozen filling keeps the cookie from spreading too much in the oven.
- Preheat your oven to 200°C (392°F) or 180°C fan (356°F) about 15 minutes before the cookies finish freezing.
- Line 2 baking trays with parchment paper.
- Remove the cookies from the freezer and place them onto the prepared trays — 4 cookies per tray is a good fit.
- Bake the cookies for 8–10 minutes. They’re done when the edges are a light golden color and the centers look slightly underbaked (this keeps them gooey).
- While cookies bake, carefully cut 4 Oreos in half horizontally so you have 8 halves ready to top the cookies.
- Once baked, very gently press the edges of the cookies with the back of a teaspoon to ensure a neat circular shape if needed. Do not remove cookies from their trays.
- Gently press one half-Oreo (cream side down) onto each warm cookie so it adheres to the surface. Be gentle to avoid causing any filling to ooze out.
- Allow the cookies to cool completely on the trays for a minimum of 2 hours so the cookies-and-cream spread can firm up. Then they’re ready to enjoy.
Practical tips:
- Avoid overmixing the flour into the creamed butter/sugar — mix just until combined to keep cookies tender.
- The freezing step is key to tall, gooey centers. Don’t skip it.
- If your oven runs hot, reduce temperature by 10–15°C and check at 7 minutes.
- Use an oven thermometer for accurate baking; a few degrees shift changes spread.
Best Pairings
- Classic: Serve warm with a glass of cold milk to cut the richness.
- Coffee & Tea: Pairs beautifully with a strong espresso or a milky latte; the bitterness balances the sweetness.
- Ice-cream sandwich: Slice a cooled cookie and sandwich a scoop of vanilla or cookies-and-cream ice cream for an over-the-top dessert.
- Party platter: Offer with salted caramel sauce on the side for drizzling or with fresh berries to balance sweetness.
Shelf Life & Storage
- Room temperature: Store in an airtight container at room temperature for up to 2 days. After that, the spread may soften and cookies can lose structure.
- Refrigeration: Store in an airtight container in the fridge for up to 5 days. Bring to room temperature or warm briefly in the oven before serving.
- Freezer: Freeze fully cooled cookies in a single layer on a tray until firm, then transfer to a freezer bag or container for up to 2 months. Thaw at room temperature or warm gently in a 150°C/300°F oven for a few minutes.
Expert Tips
- Best fats: Using real butter instead of margarine gives deeper flavor, but margarine helps achieve a softer texture that pairs well with the filled center.
- Filling consistency: Make sure the Cookies and Cream Spread balls are frozen solid before wrapping in dough. If they’re too soft, they’ll melt through the dough during baking.
- Doneness cues: Look for set but slightly soft centers and lightly golden edges — the centers will firm as they cool.
- Cookie size: These are large, decadent cookies. If you prefer smaller cookies, scale the stuffing and bake time down accordingly (6–8 minute bake for smaller rounds).
- Prevent cracking: If your dough cracks when you stuff it, let the dough sit at room temperature for 5 minutes to relax gluten before shaping.
Creative Twists
- Vegan version: Use vegan margarine, vegan white chocolate chips, and a dairy-free cookies-and-cream spread. Note texture and baking time may vary.
- Gluten-free: Replace the 310 g plain flour with a 1:1 gluten-free baking blend (look for blends containing xanthan gum). For a different texture, try an almond-flour-based version using techniques from this almond-flour recipe: Almond-flour cookie method.
- Peanut-butter core: Substitute half the Cookies and Cream spread balls with peanut butter for a peanut-and-oreo surprise.
- Double-chocolate: Replace 50 g of the plain flour with 50 g cocoa powder and swap in dark chocolate chips for a chocolate-overload version.
All Your Questions Answered
Q: Can I skip freezing the stuffed cookies?
A: Freezing is highly recommended. It prevents spreading and ensures a gooey center. If you skip it, expect flatter cookies.
Q: My centers leak during baking — what went wrong?
A: The frozen filling wasn’t frozen solid, or the dough was too thin around the filling. Refreeze and ensure a thick dough seal around the filling before baking.
Q: How can I make these less sweet?
A: Reduce the combined sugar by up to 25% (start by trimming caster sugar). Swap some white chocolate chips for chopped dark chocolate to add bitter balance.
Q: Can I prepare ahead?
A: Yes — prepare and freeze the individual, stuffed dough balls. Store frozen for up to 1 month, then bake from frozen adding 1–2 minutes to bake time.
Q: Any tips for even cookies?
A: Use a small measuring scoop to portion dough, and chill on a flat surface so they keep an even shape.
Conclusion
These Gooey OREO NYC Cookies are a celebration of contrasts — crisp edges, pillowy centers, and a molten cookies-and-cream surprise. They make an unforgettable party treat or a special weekend baking project. If you want to compare different inspirations for this style of cookie, see Jane’s take on Oreo NYC Cookies at Jane’s Patisserie Oreo NYC Cookies, and for another chunky interpretation check out Michelle Kim’s Chunky Oreo NYC Cookies.
If you bake a batch, I’d love to see your photos and variations — share them with the community and let’s compare gooey centers. Happy baking!