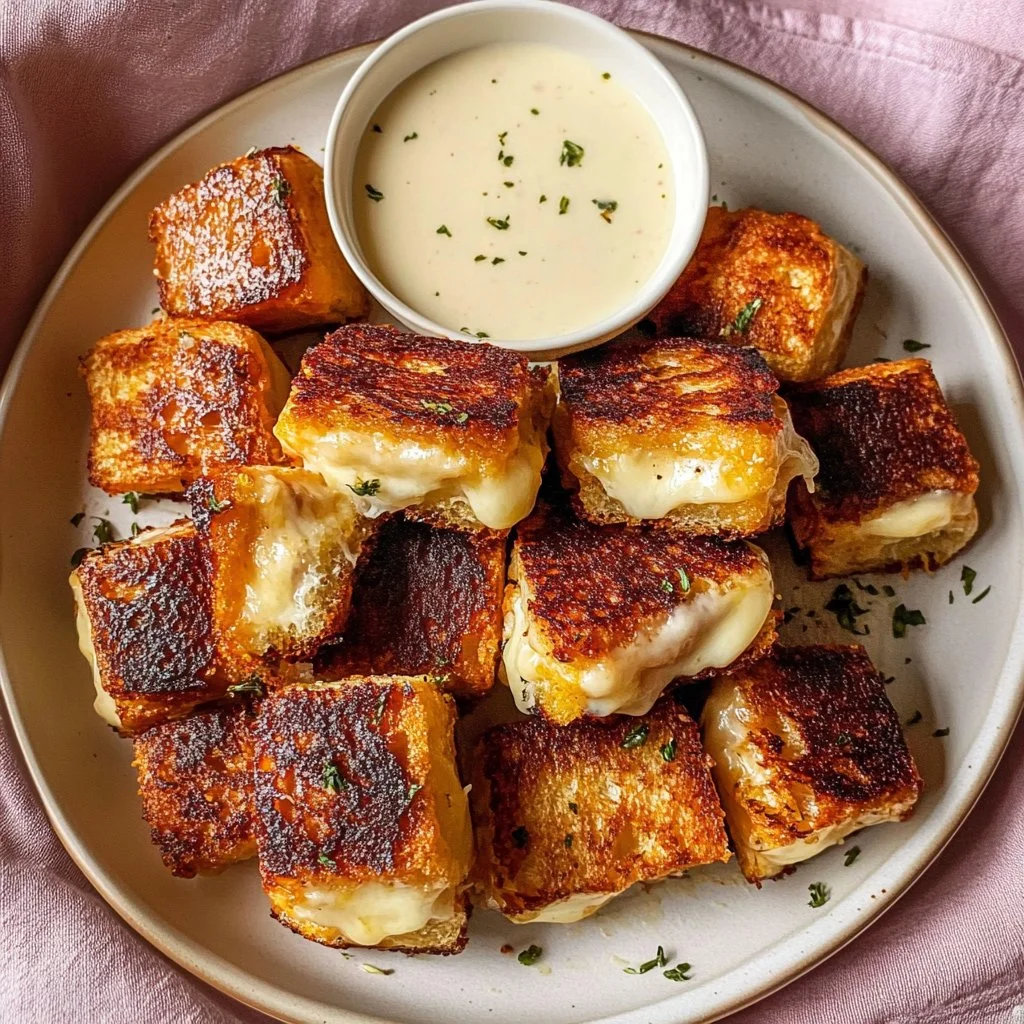
Hawaiian Roll Grilled Cheese
There’s a little magic in the sizzle and sweet-smoky scent when butter hits a hot pan and Hawaiian rolls begin to toast. Imagine pulling a shiny, golden slider apart to reveal gooey Monterey Jack stretching in slow motion—soft, pillowy bread giving way to a molten, savory center that tastes like nostalgia and comfort all at once. This Hawaiian Roll Grilled Cheese is the kind of recipe that comforts the soul: warm, slightly sweet rolls, a buttery crisp exterior, and cheese that melts into silky ribbons.
It’s perfect for lazy weekend breakfasts, quick weeknight dinners, kid-friendly lunches, or as the centerpiece of a casual gathering or game-day spread. If you like mini sandwiches that travel well to potlucks or that pair wonderfully with soup, you’ll find these irresistible. For more roll-inspired ideas that play with similar textures, check out this creative keto sandwich alternative for inspiration: keto Philly cheesesteak roll-ups inspiration.
At a Glance
- Prep Time: 5 minutes
- Cook Time: 8–10 minutes (about 3–4 minutes per side)
- Total Time: 15 minutes
- Servings: 4 sliders (one roll each)
- Difficulty Level: Easy — great for beginner cooks
Nutrition Highlights
Estimated nutritional breakdown per one Hawaiian Roll Grilled Cheese slider (1 of 4), using the ingredient quantities in this recipe and standard USDA FoodData Central values for components. These are estimates for guidance only.
- Calories: ~315 kcal
- Protein: ~11 g
- Carbohydrates: ~26 g
- Fat: ~17 g
- Saturated Fat: ~9.5 g
- Sodium: ~380 mg
- Fiber: <1 g
- Sugar: ~4 g
How these numbers were derived: cheese and bread values were estimated using USDA FoodData Central averages; general health context (e.g., saturated fat guidance) follows information from reputable health sources such as the Mayo Clinic and government nutrition resources. Nutritional totals will change if you use different roll sizes, full-fat vs. reduced-fat cheese, or add bacon/tomato. For precise personal tracking, weigh ingredients and consult USDA FoodData Central or your preferred nutrition calculator.
Why You’ll Love It
- Flavor & texture: The contrast is everything—sweet, soft Hawaiian rolls and a crisp, buttery crust give way to creamy, melted Monterey Jack. The sweetness of the rolls plays beautifully against the savory, mildly tangy cheese.
- Ease and speed: Ready in about 15 minutes with minimal equipment. It’s a fantastic last-minute meal or appetizer.
- Social and nostalgic appeal: Sliders are inherently shareable; they bring people together and often trigger warm memories—perfect for family meals or casual get-togethers.
- Versatile: Easily dressed up with bacon, tomato, herbs, or made vegetarian or vegan with suitable swaps.
Step-by-Step Instructions
Ingredients
- 4 Hawaiian rolls (kept whole, do not separate)
- 1 cup shredded Monterey Jack cheese (about 4 oz / 113 g)
- 2 tablespoons unsalted butter, softened (for buttering the insides)
- Optional: 4 thin tomato slices or 4 strips of cooked crispy bacon (one per slider)
Substitutions and optional swaps
- Cheese: Cheddar, Colby, fontina, or a blend will work. For lower fat, use reduced-fat cheese (melting will differ).
- Rolls: Any soft slider roll or dinner roll is fine; gluten-free slider rolls can be used to make it gluten-free.
- Butter alternative: Use olive oil or a vegan butter to make a dairy-free exterior. Use plant-based shredded cheese for vegan version.
Instructions
- Prepare the rolls: Slice the Hawaiian rolls in half horizontally without cutting all the way through so they stay connected as a single unit.
- Fill the rolls: Open the rolls like a book and distribute the shredded Monterey Jack evenly across the bottom halves. Add optional tomato or bacon on top of the cheese if using. Close the rolls.
- Butter the insides: Spread a thin layer of softened unsalted butter on the inside faces of each roll (the top and bottom inside surfaces). This helps achieve a golden, crisp exterior.
- Preheat the pan: Preheat a non-stick skillet over medium heat for 1–2 minutes. Make sure it’s hot but not smoking.
- Grill the sandwiches: Place the bottom halves of the rolls (cheese side down) onto the skillet. Press down slightly with the top halves so the heat and surface contact encourage even browning. Grill about 3–4 minutes per side, carefully flipping once, until both sides are deep golden brown and the cheese is melted. Reduce heat slightly if the bread browns too fast before the cheese melts.
- Finish and serve: Once crispy and melted, remove from heat, let sit 30–60 seconds, then slice into individual sliders and serve hot.
Practical tips
- If the cheese isn’t melting fast enough, cover the skillet with a lid for 30–60 seconds to trap heat.
- Use grated cheese rather than pre-shredded (which contains anti-caking agents) for smoother melts.
- Avoid very high heat—golden crust with fully melted cheese requires moderate heat.
- For even toasting, press the sandwich gently with a spatula; for more compression, use a heavy pan or press.
Best Pairings
- Classic pairings: Tomato soup, a light green salad with vinaigrette, or crispy oven fries.
- Breakfast pairing: Serve with a side of scrambled eggs and a hot cup of coffee or tea for a cozy morning.
- Party platter: Add a bowl of pickles, a mustard-dipping sauce, and kettle chips for a crowd-pleasing spread.
- Sweet companion: If you’d like a dessert pairing that echoes the Hawaiian roll’s sweetness, try a danish inspired by similar flavors: Kings Hawaiian cheesecake danish.
- Beverage pairings: Light lagers, a crisp white wine like pinot grigio, or iced tea balance the richness nicely.
Storing Leftovers
- Room temperature: Do not leave grilled cheese with perishable fillings (cheese, tomato) at room temperature for more than 2 hours (USDA food safety guideline).
- Refrigeration: Store cooled sandwiches in an airtight container in the fridge for 3–4 days. Reheat gently to restore crispness.
- Freezer: Wrap individually in plastic wrap and place in a freezer-safe bag; best quality for up to 2 months. Thaw overnight in the fridge before reheating.
- Reheating: Reheat in a skillet over low-medium heat, covered for a minute to ensure the center warms, then uncover to crisp the exterior. Avoid microwaving if you want to preserve crispness.
Chef’s Advice
- Cheese texture key: Finely shred the Monterey Jack (or use a thinner grate) so it melts evenly and quickly.
- Butter technique: Softened butter spread thinly on the inside surfaces browns better than melted butter brushed on top.
- Don’t overcrowd the pan: Cook in batches if needed so each slider gets proper contact with the skillet.
- Temperature cue: When the bottom is golden after ~3 minutes, peek inside—if the cheese is just beginning to ooze, it’s ready to flip. If the bread is darkening but cheese is still firm, lower the heat and cover briefly.
- Make-ahead trick: Assemble sliders and store covered in the fridge for up to 8 hours; grill just before serving for fresher texture.
Creative Twists
- Bacon-Tomato Melt: Add a strip of crispy bacon and a thin tomato slice before closing for a BLT-style slider. Finish with a light smear of pesto for brightness.
- Spicy Pepper Jack Kick: Swap Monterey Jack for pepper jack and add thinly sliced pickled jalapeños for heat.
- Vegan option: Use vegan buttery spread and a plant-based melting cheese; place on a sturdy gluten-free slider roll if needed. Grill carefully—vegan cheeses melt differently, so lower heat and cover to encourage melting.
- Herb & Garlic Butter: Mix 1 tsp minced garlic and 1 tsp chopped fresh parsley into the softened butter used inside the rolls for a garlicky, herb-forward flavor.
- Baked party sliders: Assemble a block of 8 connected rolls in a baking dish, brush tops with garlic butter, sprinkle extra cheese, and bake at 350°F (175°C) for 10–12 minutes until cheese is melted—perfect for serving a crowd.
Recipe Q&A
Q: Can I use pre-sliced cheese instead of shredded?
A: Yes—pre-sliced works fine. Slightly thicker slices may take a little longer to melt. Place them in a single layer for even melting.
Q: My bread browns too fast but the cheese isn’t melted—what do I do?
A: Lower the heat and cover the pan for 30–60 seconds to trap heat and melt the cheese without burning the bread.
Q: How can I make these healthier?
A: Use reduced-fat cheese, whole-grain or smaller rolls, and a light spray of olive oil instead of butter. Watch portion size and pair with a salad.
Q: Can I double or triple this recipe for a crowd?
A: Yes. Grill in batches or use a large griddle to cook multiple sliders at once. You can also bake sliders assembled in a pan as a simpler, hands-off method.
Q: What’s the best way to re-crisp leftovers?
A: Use a skillet over medium-low heat and re-sear each side for 1–2 minutes; cover briefly if the center needs to warm through. An air fryer at 350°F for 3–4 minutes also works well.
Conclusion
Go ahead—make these Hawaiian Roll Grilled Cheese sliders this week. They’re quick, comforting, and endlessly adaptable for whatever mood or crowd you’re feeding. If you want a baked slider spin with a crowd-sized approach, this easy mini grilled Hawaiian roll slider tutorial is a great companion to try: easy baked mini grilled Hawaiian roll sliders recipe. For a garlic-forward take that amplifies buttery flavor, this garlic grilled cheese Hawaiian rolls guide offers another delicious variation: garlic grilled cheese Hawaiian rolls tutorial.
If you try the recipe, please share your photos and tweaks in the comments—I love seeing how you make it your own.