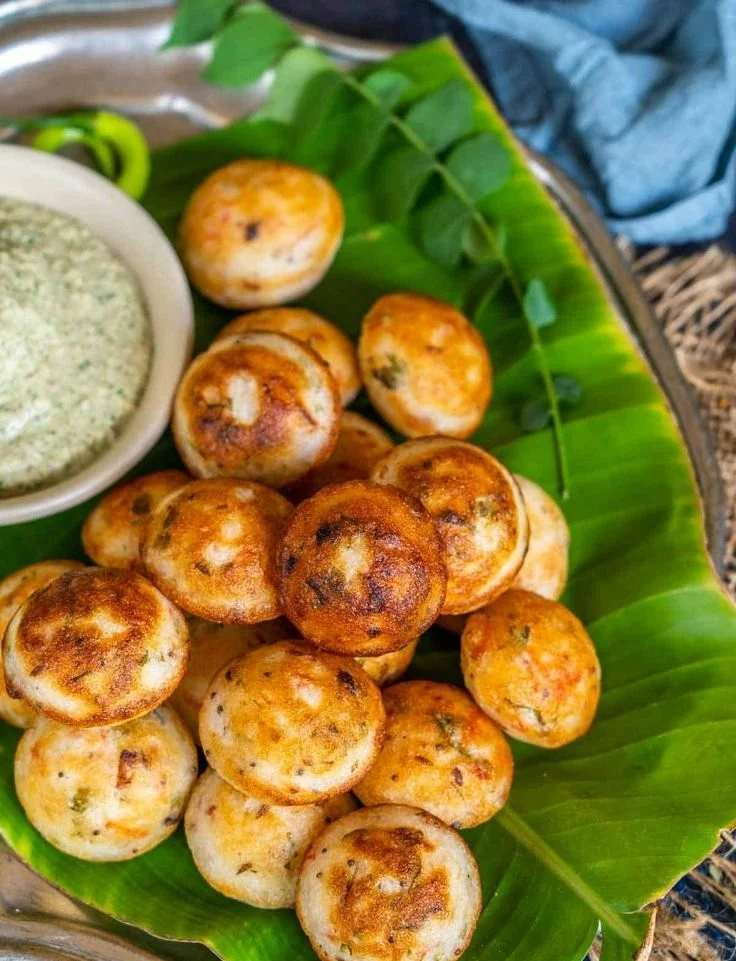
Kuzhi Paniyaram Recipe
There’s something unexpectedly magical about kuzhi paniyaram: small, golden-brown pockets of comfort that release a warm, spiced aroma the moment they hit the pan. Imagine the gentle hiss of oil, the sweet-savoury scent of sautéed onions and curry leaves, and the first bite — a crisp exterior giving way to a soft, pillowy interior studded with bright carrot and fresh coconut. Each morsel is a contrast of textures and an echo of South Indian home kitchens: humble, fragrant, and utterly welcoming.
This recipe is perfect for cozy breakfasts when you want something more than toast, for bustling teatime gatherings where guests can nibble happily, or as a quick, satisfying snack between meals. If you’re assembling a brunch spread or looking for an appetizer that pairs beautifully with chai, kuzhi paniyaram delivers. For more inspiration on small bites to round out your snack or appetizer table, try this appetizer ideas collection — it’s a great companion to your paniyaram plan.
At a Glance
- Prep Time: 10–15 minutes (plus batter fermentation time if making from scratch)
- Cook Time: 20–30 minutes (depending on pan size and batch count)
- Total Time: 30–45 minutes active (excluding fermentation)
- Servings: 4 (about 18–24 small paniyarams; 4–6 pieces per person)
- Difficulty Level: Easy — beginner-friendly once you have the pan
Nutrition Highlights
The following nutritional breakdown is an estimate per serving (1 of 4 servings) for the recipe as written. Values are approximate and derived from typical ingredient nutrient profiles (USDA FoodData Central and standard recipe analyses). If you need exact numbers for medical reasons, weigh your portions and use a nutrition calculator.
Estimated nutrition per serving:
- Calories: ~300 kcal
- Protein: ~6 g
- Carbohydrates: ~38 g
- Fat: ~12 g
- Fiber: ~3 g
- Sodium: ~450 mg
Notes: The calories and macros will vary based on the exact composition of your idli/dosa batter (rice-to-urad ratio), the amount of oil used while cooking, and any optional ingredients. These figures are provided as a science-based estimate and to help with meal planning and portion control (sources: USDA FoodData Central; general guidance from nutrition authorities such as Mayo Clinic).
Why You’ll Love It
- Flavor & Aroma: The tempering of mustard, cumin, curry leaves and asafoetida creates an irresistible, singed-herb aroma that elevates simple fermented batter into something celebratory.
- Comfort & Tradition: Kuzhi paniyaram is a nostalgic dish for many—perfect for sharing with family, reminding us of weekend breakfasts and festival mornings.
- Ease & Versatility: Once your batter is ready, assembly and cooking are quick. The dish is also a great vehicle for sneaking in vegetables (carrot, grated beet, spinach) and fresh herbs.
- Crowd-pleaser: Bite-sized and snack-friendly, paniyarams are ideal for social gatherings and pair wonderfully with both chutneys and coffee/tea.
Cooking Directions
Ingredients
- 1 tablespoon oil
- 1 teaspoon black mustard seeds
- 1 teaspoon cumin seeds
- 6–8 curry leaves
- ½ cup finely chopped onions (about 1 small onion)
- 1 teaspoon finely chopped green chilies (adjust to taste)
- ¼ cup grated carrot
- 2 tablespoons grated fresh coconut
- 3 cups idli or dosa batter
- 2 tablespoons chopped cilantro (fresh coriander leaves)
- ¼ teaspoon asafetida (hing) — omit for gluten-free if desired
- 1 teaspoon salt (or to taste)
- Oil for cooking (about 1–2 tablespoons extra, depending on pan and number of cavities)
Optional ingredients and substitutions
- Add 2–3 tablespoons finely chopped bell pepper for color and crunch.
- For a protein boost, stir in 2 tablespoons roasted chana dal (pottukadalai) powder.
- Make it spicier with an extra chopped green chili or ¼ teaspoon red chili powder.
- Use a gluten-free labeled asafetida or skip entirely if sensitive.
- For vegan variations no change needed — this recipe is naturally vegan if your batter is made without dairy.
Step-by-step Instructions
- Heat 1 tablespoon oil in a small pan over medium heat.
- Once the oil is hot, add mustard seeds, cumin seeds, and curry leaves. Let them crackle for about 4–5 seconds.
- Add onions, green chilies, grated carrot, and fresh coconut. Fry for 3–4 minutes, stirring frequently until onions soften and the mixture becomes fragrant.
- Remove the pan from heat and let the tempering cool slightly.
- In a large mixing bowl, add the 3 cups idli/dosa batter. Stir in the cooled tempering mixture.
- Add cilantro, asafetida, and salt. Mix well to combine. Avoid overmixing; you want a homogenous batter but keep the fermentation bubbles intact.
- Heat a paniyaram chatti (paniyaram pan) or Aebleskiver pan over medium heat. Brush or drop about 1/4 teaspoon oil into each cavity as the pan heats.
- Pour spoonfuls of batter into the cavities until they are almost full.
- Cover the pan with a lid and cook for 3–4 minutes until the bottoms are brown and crisp.
- Turn each paniyaram using a wooden skewer or spoon and cook on the other side for another 2–3 minutes until evenly browned and cooked through.
- Remove the paniyarams to a plate. Repeat until all batter is used. Keep cooked paniyarams in a warm plate or hot case so they stay crisp until serving.
Practical tips
- Avoid overmixing the batter: gentle folding preserves aeration and yields fluffier interiors.
- If your batter is very thick, add a tablespoon of water to reach a pourable consistency.
- Check doneness by inserting a skewer; it should come out clean and the interior should be soft but not wet.
- Preheat the pan well; a hot pan yields crisp bottoms without overcooking the inside.
Serving Suggestions
- Serve plain, hot from the pan with a pat of ghee or butter for indulgence.
- Classic pairings: coconut chutney, tomato-onion chutney, or mint-coriander chutney. They’re also lovely with sambar for a fuller meal.
- For teatime: present paniyarams with hot chai or filter coffee — they make a naturally dipping-friendly snack.
- Make a platter: offer an assortment of dips (yogurt dip, peanut chutney) and fresh lime wedges for guests to customize. For more appetizer pairing inspiration, see this appetizer roundup.
Keeping it Fresh
Room temperature
- Best consumed within 6–8 hours for optimal texture and food safety. Keep covered to retain warmth and prevent drying.
Refrigeration
- Store cooled, cooked paniyarams in an airtight container for 2–3 days. Reheat in a skillet or oven to restore crispness.
Freezer
- Freeze cooked paniyarams in a single layer on a tray until firm, then transfer to a freezer-safe bag or container for up to 1 month. Reheat from frozen in a hot oven or skillet until heated through and crisp.
Chef’s Advice
- Batter readiness: If making batter from scratch, the right fermentation gives a mildly sour, aromatic base. Underfermented batter yields denser paniyarams.
- Pan care: Use a heavy cast-iron or nonstick paniyaram pan and keep it seasoned to prevent sticking and to get an even browning.
- Oil control: Too much oil can make paniyarams soggy; too little and they’ll stick. A light brush or 1/4 tsp per cavity typically suffices.
- Even heat: Cook over medium heat — high heat chars the outside before the inside cooks; low heat makes them pale and dense.
- Uniform size: Use a spoon or small ladle to portion batter evenly; similar-sized paniyarams cook at the same rate.
Creative Twists
- Cheesy Paniyaram
- Add a small cube of quick-melting cheese (mozzarella or processed cheese) into the center of each cavity along with the batter. Serve hot so the cheese is gooey.
- Vegetable-packed Savory Muffins
- Stir in grated beetroot, chopped spinach, or finely chopped spring onions for a nutrient boost and bright color. Squeeze out excess moisture from wet vegetables before mixing.
- Spicy Masala Paniyaram
- Sauté 1 small potato with turmeric, mustard seeds, and a pinch of garam masala. Mix small spoonfuls into the batter cavities for a masala-stuffed version.
- Sweet Paniyaram
- For a dessert-style version, use slightly sweetened batter (1–2 tsp sugar), add finely chopped banana pieces and a dusting of cinnamon. Cook with a touch of ghee for a golden finish.
All Your Questions Answered
Q: Can I use store-bought idli batter?
A: Yes — store-bought idli/dosa batter works well. Adjust salt and water consistency if it’s very thick.
Q: How do I fix dense, heavy paniyarams?
A: Ensure your batter is well-fermented (if homemade), do not overmix once tempering is added, and use moderate heat so they cook through but stay airy.
Q: Is there a gluten-free version?
A: Traditional idli/dosa batter (rice and urad dal) is gluten-free. Avoid adding commercial hing blends containing wheat; use pure asafetida or skip it.
Q: Can I make them ahead for a party?
A: Yes — cook them ahead, keep them warm in a low oven, or re-crisp in a skillet or oven before serving. For larger events, consider freezing cooked paniyarams and reheating as needed.
Q: Healthy tweaks?
A: Reduce oil when tempering and for cooking, add more vegetables, or use millets (ragi or foxtail millet) blended into the batter for fiber and micronutrient boosts.
Conclusion
Kuzhi paniyaram is a small, soulful dish that rewards simple ingredients and a little patience with fermentation and heat. Its crispy exterior and tender interior make it endlessly adaptable — from savory teatime nibble to a comforting breakfast centerpiece. Try this method, play with the variations, and share your results with friends and family.
For two classic and regional takes you can compare and explore further techniques and flavor profiles, see this Chettinad-style version: Chettinad Kuzhi Paniyaram Recipe and this home-kitchen favorite: Paniyaram Recipe | Kuzhi Paniyaram Recipe – Sharmis Passions.
Happy cooking — and don’t forget to tell us how your paniyarams turned out!
Print
Kuzhi Paniyaram
- Total Time: 45 minutes
- Yield: 4 servings 1x
- Diet: Vegan
Description
A delightful South Indian dish made of small, golden-brown crispy balls filled with a spiced mixture of onions, curry leaves, and coconut, perfect for breakfasts, snacks, or brunch gatherings.
Ingredients
- 1 tablespoon oil
- 1 teaspoon black mustard seeds
- 1 teaspoon cumin seeds
- 6–8 curry leaves
- ½ cup finely chopped onions (about 1 small onion)
- 1 teaspoon finely chopped green chilies (adjust to taste)
- ¼ cup grated carrot
- 2 tablespoons grated fresh coconut
- 3 cups idli or dosa batter
- 2 tablespoons chopped cilantro (fresh coriander leaves)
- ¼ teaspoon asafetida (hing) — omit for gluten-free if desired
- 1 teaspoon salt (or to taste)
- Oil for cooking (about 1–2 tablespoons extra, depending on pan and number of cavities)
Instructions
- Heat 1 tablespoon oil in a small pan over medium heat.
- Add mustard seeds, cumin seeds, and curry leaves. Let them crackle for about 4–5 seconds.
- Add onions, green chilies, grated carrot, and fresh coconut. Fry for 3–4 minutes until fragrant.
- Remove from heat and let the tempering cool slightly.
- In a large mixing bowl, add the idli/dosa batter and stir in the cooled tempering mixture.
- Add cilantro, asafetida, and salt. Mix well without overmixing.
- Heat a paniyaram pan over medium heat. Brush oil into each cavity.
- Pour batter into the cavities until almost full.
- Cover the pan and cook for 3–4 minutes until the bottoms are crisp.
- Turn each paniyaram and cook for another 2–3 minutes until browned and cooked through.
- Remove and repeat until all batter is used.
Notes
Best consumed within 6–8 hours for optimal texture. Store cooked paniyarams in an airtight container for 2–3 days, or freeze for up to 1 month.
- Prep Time: 15 minutes
- Cook Time: 30 minutes
- Category: Snack
- Method: Pan-frying
- Cuisine: Indian
Nutrition
- Serving Size: 1 serving
- Calories: 300
- Sugar: 3g
- Sodium: 450mg
- Fat: 12g
- Saturated Fat: 2g
- Unsaturated Fat: 10g
- Trans Fat: 0g
- Carbohydrates: 38g
- Fiber: 3g
- Protein: 6g
- Cholesterol: 0mg