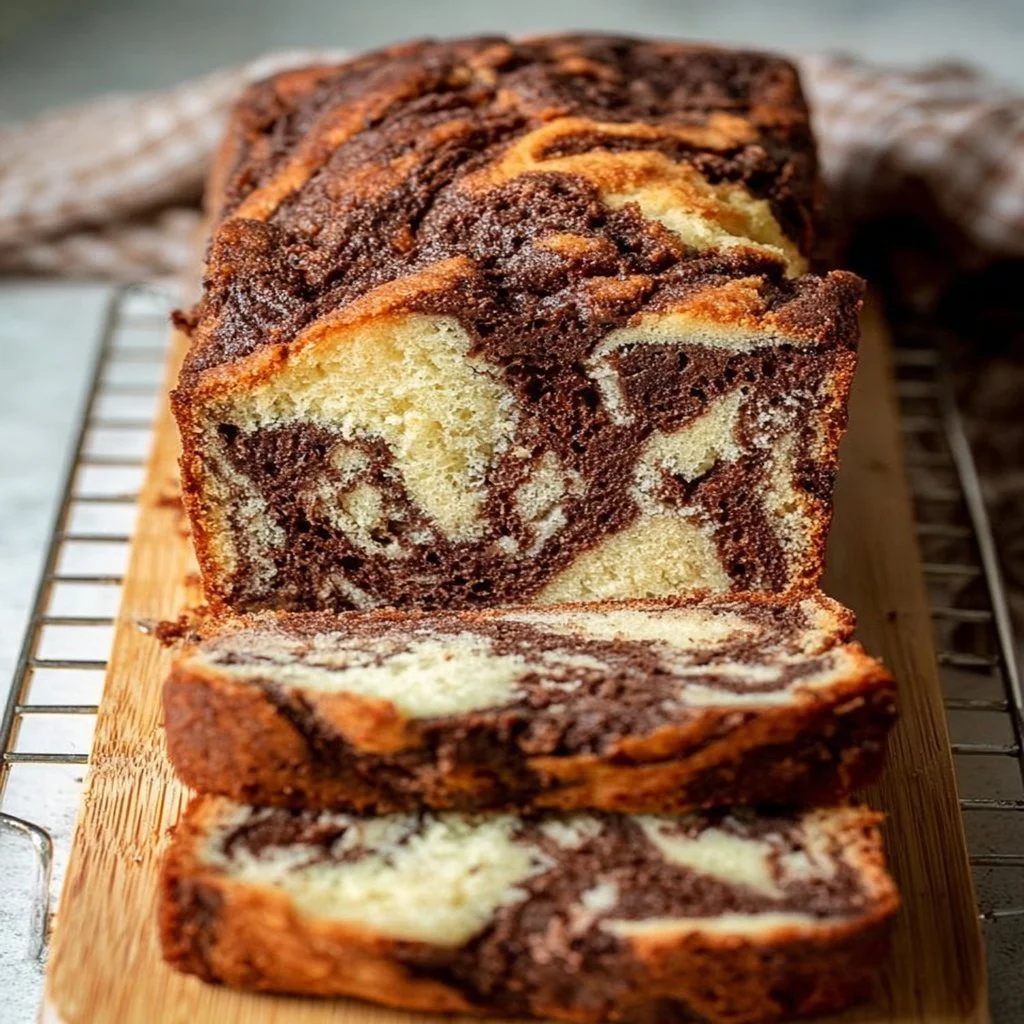
Marble Loaf Cake — a tender, swirled loaf that smells like butter, vanilla, and a whisper of cocoa the moment it comes out of the oven. The crumb should be soft but springy, with pockets of chocolate ribboned through a vanilla base; the crust lightly golden and slightly crisp at the edges. With every slice you get a contrast of sweet, cocoa bitterness, and melt-in-your-mouth butteriness — comfort in loaf form. This recipe is perfect for cozy weekend breakfasts with a hot cup of coffee, for afternoon tea, or as a homemade treat to bring to gatherings and holiday tables. It’s one of those cakes that feels both nostalgic (think family kitchens and childhood afternoons) and impressively simple to make.
If you love loaf cakes and layered desserts, try a lighter, fruit-forward option like Blueberry Coconut Vegan Cheesecake for a different kind of showstopper.
At a Glance
- Prep Time: 15 minutes
- Cook Time: 50–60 minutes
- Total Time: 1 hour 5–15 minutes (including cooling)
- Servings: 8 generous slices
- Difficulty Level: Easy — ideal for beginner bakers
Nutrition Highlights
Nutrition per serving (based on 8 servings):
- Calories: ~325 kcal
- Protein: ~5.5 g
- Carbohydrates: ~45 g
- Fat: ~15 g
- Fiber: ~1–2 g
- Sodium: variable (from salt and baking powder)
These estimates were calculated using ingredient composition values from USDA FoodData Central (USDA FoodData Central is a reliable government resource for nutrient values). Exact values will vary depending on ingredient brands, whether you use low-fat milk, or add extras like nuts or glaze.
Why You’ll Love It
- Irresistible contrast: The visual swirl is as satisfying as the taste — you get both chocolate depth and vanilla lift in every bite.
- Comfort and celebration: This loaf hits that cozy, nostalgic sweet spot without being fussy — great for a quiet morning or as a crowd-pleasing offering at brunch.
- Easy showmanship: The marbling looks fancy but requires no special tools — perfect when you want to impress without stress.
- Make-ahead friendly: It keeps well and slices cleanly after cooling, so you can bake in the morning and serve later in the day.
Step-by-Step Instructions
Ingredients
- 1 ½ cups all-purpose flour
- 1 cup granulated sugar
- 1 ½ tsp baking powder
- ½ tsp salt
- ½ cup unsalted butter (room temperature) — 113 g
- 3 large eggs
- 2 tsp vanilla extract
- ¼ cup unsweetened cocoa powder
- ½ cup milk (optional; use for a slightly softer crumb)
Optional ingredients and substitutions
- Swap butter for salted butter (omit extra salt) or use ½ cup neutral oil for a moister loaf (texture will differ).
- Use 1% or skim milk if you prefer less fat — texture will be slightly less rich.
- For a dairy-free version, substitute butter with a plant-based spread and milk with oat or almond milk (see variations).
- Add ½ cup chopped walnuts or chocolate chips to either batter for texture.
Directions
- Preheat the oven to 350°F (175°C). Grease a standard 9×5-inch loaf pan and line it with parchment paper, leaving an overhang for easy removal.
- In a medium bowl, whisk together the flour, baking powder, and salt until evenly distributed. Set aside.
- In a large bowl (or stand mixer), cream the softened butter and granulated sugar together until light and fluffy — about 2–3 minutes. Scrape down the bowl as needed.
- Add the eggs one at a time, beating well after each addition. Stir in the vanilla extract.
- Gradually add the dry ingredients to the wet mixture, alternating with the milk: add one-third of the dry, then half of the milk (if using), another third of dry, remaining milk, and finish with the last third of dry. Mix until just combined — don’t overmix.
- Scoop about one-third of the batter into a separate bowl. Add the cocoa powder to that portion and mix until smooth and evenly dark. If the chocolate batter is too stiff, add 1–2 tablespoons of milk to loosen.
- Spoon alternating dollops of vanilla and chocolate batter into the prepared loaf pan. Once all the batter is in, swirl gently with a skewer or knife in an “S” motion to create marbling — avoid over-swirl to keep distinct ribbons.
- Bake for 50–60 minutes, or until a toothpick inserted into the center comes out clean or with a few moist crumbs (but not wet batter). Rotate the pan halfway through baking if your oven has hot spots.
- Allow the loaf to cool in the pan for 10–15 minutes, then use the parchment overhang to lift the cake out and transfer it to a wire rack to cool completely before slicing.
Practical tips
- Avoid overmixing once flour is added; overworked batter creates a dense loaf.
- If the top browns too fast, tent with foil for the last 10–15 minutes.
- If you want a lighter crumb similar to sponge-style loafs, explore techniques used in other batter-based loaves for aeration; for inspiration see this 7-Up cake method.
- Let the loaf cool fully if you plan to slice thin pieces — warm slices can crumble.
Best Pairings
- Morning coffee or latte: a classic, comforting match.
- Afternoon tea: serve with a slice of fresh citrus marmalade or clotted cream for contrast.
- Simple butter or mascarpone: a smear of room-temperature butter or sweetened mascarpone heightens richness.
- For a brunch spread, serve alongside savory dishes — it pairs especially well with a hearty casserole like Best Mac and Cheese Meatloaf Casserole.
- Dessert upgrade: warm a slice and top with vanilla ice cream and a drizzle of chocolate sauce.
Storage Instructions
- Room temperature: Store in an airtight container or wrapped tightly in plastic wrap at room temperature for up to 2 days. Keep away from heat and direct sunlight.
- Refrigeration: Refrigerate for up to 5 days if you’ve added a perishable glaze or topping (wrap well to prevent drying). Bring to room temperature or warm gently before serving to restore tenderness.
- Freezer: Wrap tightly in plastic and then foil, or freeze in an airtight container for up to 3 months. Thaw overnight in the refrigerator and bring to room temperature before serving.
Chef’s Advice
- Temperature matters: Use room-temperature butter and eggs to help the batter emulsify smoothly and trap air for lift.
- Measure flour correctly: Spoon-and-level flour into your measuring cup instead of scooping to avoid a dry, dense loaf. If you weigh ingredients, 1 ½ cups all-purpose flour ≈ 180 g.
- Cocoa balance: Use unsweetened natural cocoa for a bright chocolate flavor; Dutch-processed cocoa will produce a milder, darker flavor and may slightly affect leavening if your recipe is sensitive.
- Don’t over-swirl: Gentle swirls yield clear marbling. Too much swirling blends the batters and loses the visual contrast.
- Crust control: If the center appears underbaked but the crust is dark, lower the temperature to 325°F (160°C) and continue baking until done — this prevents over-browning.
Creative Twists
- Citrus Marble: Add 1–2 tsp finely grated orange zest to the vanilla batter and swap half the milk for freshly squeezed orange juice for bright notes.
- Nut & Espresso: Stir 1 tsp instant espresso powder into the chocolate batter and fold in ½ cup chopped toasted hazelnuts for a mocha-nut loaf.
- Vegan Version: Replace butter with ½ cup neutral oil + 2 tbsp applesauce, use 3 flax “eggs” (3 tbsp ground flax + 9 tbsp water, chilled), and non-dairy milk. Use dairy-free spread and ensure chocolate is dairy-free. Baking time may vary slightly.
- Gluten-Free: Use a 1:1 gluten-free flour blend with xanthan gum. Let the batter rest 10 minutes before baking to hydrate, then bake as directed; texture will be a touch different but still delightful.
All Your Questions Answered
Q: Can I halve the recipe?
A: Yes. Use a smaller loaf pan (about 8×4 inches) and check doneness around 35–45 minutes — oven times vary.
Q: Why did my loaf sink in the middle?
A: Common causes: underbaked center (check with toothpick), opening the oven door too early, or too much leavening. Ensure accurate measuring and bake until set.
Q: Can I make this ahead of time?
A: Absolutely. Bake a day ahead and store at room temperature in an airtight container; refresh by warming briefly before serving.
Q: How do I prevent a gritty cocoa swirl?
A: Sift cocoa powder and mix it thoroughly with the portioned batter (adding a tablespoon of milk if needed) to ensure smooth incorporation.
Q: Healthier swaps?
A: Reduce sugar slightly, use applesauce for half the butter, or swap whole milk for lower-fat milk — these will change texture but can reduce calories and fat.
Conclusion
If you’re looking for a reliable, crowd-pleasing loaf that balances ease with elegance, this Marble Loaf Cake is a winner — perfect for cozy mornings, potlucks, or gifting a slice to a neighbor. For more inspiration and to compare techniques, check out the updated recipe and tips at Marble Loaf Cake (Updated!) – Sally’s Baking Addiction, and explore a classic take at Classic Marble Loaf Cake – Red Currant Bakery.
I’d love to see your marbling — share your results, tips, or photos in the comments or on social media so we can build a community of loaf lovers. Happy baking!