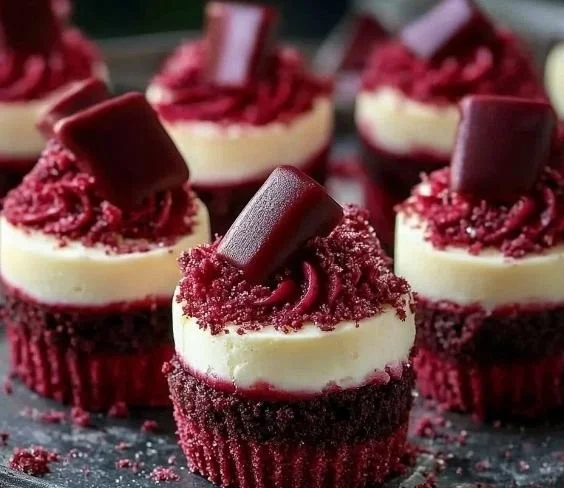
Red Velvet Mini Cheesecakes
Introduction
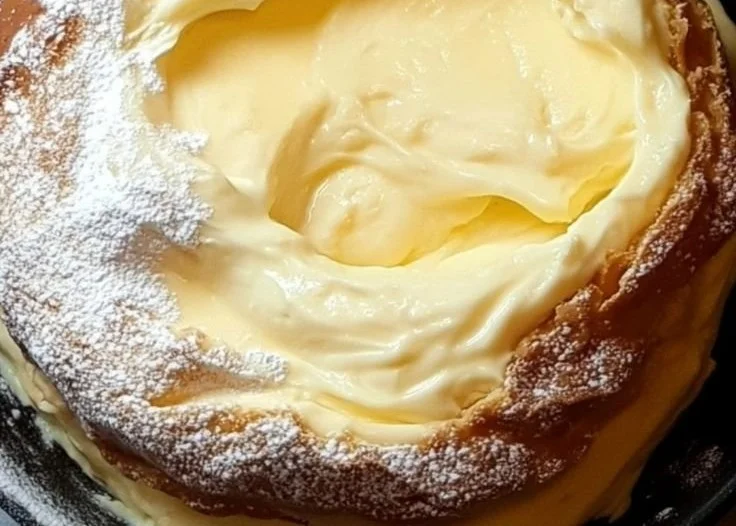
Imagine pulling a tray from the oven and being greeted by a warm, buttery aroma threaded with cocoa and a whisper of vanilla — the first taste is a tender, tangy cream cheese filling sitting atop a subtly chocolaty red crust, collapsing into a melt-in-your-mouth texture that begs a second bite. These Red Velvet Mini Cheesecakes are small in size but enormous in comfort: each bite balances the smooth, slightly tangy cheesecake with the nostalgic, velvet-hued cake crust. They’re visually charming, delightfully moist, and perfect for sharing.
They’re ideal for festive gatherings, bridal or baby showers, and holiday dessert tables, but they’re just as lovely for a cozy weekend brunch or an afternoon coffee break. If you enjoy bite-sized desserts and want extra tips for perfect minis, see my mini cheesecakes guide for ideas on pans and portioning.
At a Glance
- Prep Time: 15 minutes
- Cook Time: 15–20 minutes
- Total Time (including chilling): about 2 hours 35 minutes (includes 2 hours refrigeration)
- Servings: 12 mini cheesecakes
- Difficulty Level: Easy — great for beginner bakers
Nutrition Highlights
Estimated nutrition per mini cheesecake (1 of 12 servings):
- Calories: ~180 kcal
- Protein: ~2.6 g
- Carbohydrates: ~13 g
- Fat: ~13 g
These values are estimates based on ingredient standard references (USDA FoodData Central) and standard portion sizes. For authoritative guidance on diet and portioning, consult resources like the USDA and the Mayo Clinic.
Perfect For…
These mini cheesecakes shine when you want to impress without fuss. They hit several sweet spots:
- Social: Perfect finger-food dessert for parties and potlucks — no cutting slices required.
- Emotional: The red velvet color and cream-cheese tang evoke holiday warmth and celebratory cheer.
- Practical: Quick to assemble and bake; chilling time is mostly hands-off.
- Seasonal: Lovely for Valentine’s Day, Christmas, or any occasion when a festive pop of color is welcome.
Preparation Guide
Ingredients
- 1 cup red velvet cake mix
- 2 tablespoons butter, melted
- 1 egg
- 8 oz (226 g) cream cheese, softened
- 1/4 cup (50 g) granulated sugar
- 1 teaspoon vanilla extract
- 1/2 cup (120 mL) heavy cream
- 1 tablespoon unsweetened cocoa powder
Optional ingredients and substitutions
- For a gluten-free version: use a gluten-free red velvet cake mix.
- For lower sugar: use a zero-calorie sweetener equivalent in the cream cheese filling (adjust to taste).
- For a tangier filling: add 1 tablespoon lemon juice or 1/4 cup sour cream.
- For a dairy-free/vegan version: see the variations section below for suggested swaps.
Step-by-step Instructions
- Preheat the oven to 350°F (175°C).
- In a bowl, mix the red velvet cake mix, melted butter, and egg until combined.
- Press the mixture into the bottom of mini cheesecake pans (or lined muffin tins) to form the crust — about 1–1.5 tablespoons per cup cavity, pressed firmly.
- In another bowl, beat the cream cheese, sugar, and vanilla extract until smooth and free of lumps.
- Pour the cream cheese filling over the crusts, filling each about 2/3 full.
- Bake for 15–20 minutes, or until the centers are mostly set (they should still have a slight jiggle).
- Let cool to room temperature, then refrigerate for at least 2 hours to fully set.
- Before serving, whip the heavy cream until soft peaks form and dollop on top of each cheesecake, then sprinkle with cocoa powder.
Practical tips
- Avoid overmixing the cream cheese filling to prevent excess air (which can cause cracks). Mix until smooth and just combined.
- Test doneness by giving the pan a gentle shake — the edges should be set while the center has a slight jiggle. The cheesecakes will continue to set as they cool.
- If using a muffin tin, line with paper liners or use silicone cups for easier removal. Chill well before unmolding to keep shaped edges.
Best Pairings
- Plain: Let the whipped cream and cocoa powder shine for a classic finish.
- With coffee or espresso: The creaminess and subtle cocoa pair beautifully with a bright cup of coffee.
- Berry compote: Serve with a spoonful of warm raspberry or strawberry compote for acidity and color contrast.
- Chocolate drizzle: A thin swirl of warm ganache adds elegance for special occasions.
- For kids: top with colorful sprinkles or mini chocolate chips for festive flair.
Keeping it Fresh
- Room temperature: Do not keep these at room temperature for more than 2 hours (per standard food safety guidelines for dairy-based desserts).
- Refrigeration: Store covered in an airtight container in the refrigerator for up to 4 days. Place parchment between layers to prevent sticking.
- Freezer: Freeze individually on a tray, then transfer to a sealed freezer bag or container for up to 2 months. Thaw overnight in the refrigerator before serving; top with whipped cream just before serving.
Pro Tips & Tricks
- Use full-fat cream cheese and heavy cream for the creamiest, most stable filling — low-fat versions can be grainy or thin.
- Soften cream cheese at room temperature for 30–60 minutes to avoid lumps; if slightly lumpy, beat on low until smooth.
- To prevent the crust from becoming soggy, press the cake mix crust firmly and bake briefly if using a very moist filling — or pre-bake crust for 3–4 minutes and cool before filling.
- If you want perfect tops, run a thin knife around the edge of each cavity as soon as you remove the cheesecakes from the oven to avoid cracking as they cool.
Fun Flavor Ideas
- Chocolate Swirl: Fold 1–2 tablespoons melted dark chocolate into part of the filling and swirl with a toothpick before baking.
- Red Velvet Cheesecake Bites with Berry Compote: Top each mini with warm raspberry preserves or compote for a tart contrast.
- Vegan version: Use dairy-free cream cheese (e.g., cashew- or soy-based), vegan butter, and a flax egg (1 tbsp ground flax + 3 tbsp water, let sit 5 minutes). Use a vegan red velvet mix or make a homemade cocoa-sweetened crust.
- Espresso Kick: Add 1 teaspoon instant espresso powder to the filling for a mocha-red velvet hybrid.
All Your Questions Answered
Q: Can I make these ahead for a party?
A: Yes — make them up to 2 days ahead and refrigerate; top with whipped cream just before serving for best texture.
Q: They’re cracked — can I still serve them?
A: Yes. Cracks are cosmetic and can be hidden with whipped cream, ganache, or fruit compote.
Q: Can I double the recipe?
A: Absolutely — double all ingredients and bake in batches or use multiple pans. Keep the same temperature and baking time for mini pans.
Q: How can I make them less sweet?
A: Reduce the added sugar in the filling slightly, use a cake mix labeled “less sugar,” or balance sweetness with a tart topping like fresh berries.
Q: Are there healthier swaps?
A: Try lower-sugar cake mix and use a light whipped topping in moderation, but note that swapping lower-fat dairy can change texture and stability.
Conclusion
Give these Red Velvet Mini Cheesecakes a try the next time you want a charming, crowd-pleasing dessert — they’re quick to assemble, fun to present, and endlessly adaptable. For another inspiration on mini red velvet treats, see this approachable recipe from Mini Red Velvet Cheesecakes, and for a playful twist you can compare ideas from Mini Red Velvet Cheesecakes | The Girl Who Ate Everything. If you try the recipe, I’d love to hear how yours turned out — share your photos and tips in the comments or tag your creations to keep the baking conversation going.
Print
Red Velvet Mini Cheesecakes
- Total Time: 155
- Yield: 12 mini cheesecakes 1x
- Diet: Vegetarian
Description
These charming Red Velvet Mini Cheesecakes feature a tender, tangy cream cheese filling atop a subtly chocolaty red crust, perfect for gatherings and celebrations.
Ingredients
- 1 cup red velvet cake mix
- 2 tablespoons butter, melted
- 1 egg
- 8 oz (226 g) cream cheese, softened
- 1/4 cup (50 g) granulated sugar
- 1 teaspoon vanilla extract
- 1/2 cup (120 mL) heavy cream
- 1 tablespoon unsweetened cocoa powder
Instructions
- Preheat the oven to 350°F (175°C).
- In a bowl, mix the red velvet cake mix, melted butter, and egg until combined.
- Press the mixture into the bottom of mini cheesecake pans (or lined muffin tins) to form the crust — about 1–1.5 tablespoons per cup cavity, pressed firmly.
- In another bowl, beat the cream cheese, sugar, and vanilla extract until smooth and free of lumps.
- Pour the cream cheese filling over the crusts, filling each about 2/3 full.
- Bake for 15–20 minutes, or until the centers are mostly set (they should still have a slight jiggle).
- Let cool to room temperature, then refrigerate for at least 2 hours to fully set.
- Before serving, whip the heavy cream until soft peaks form and dollop on top of each cheesecake, then sprinkle with cocoa powder.
Notes
For a gluten-free version, use a gluten-free red velvet cake mix. For a tangier filling, add lemon juice or sour cream. If using a muffin tin, line with paper liners for easier removal.
- Prep Time: 15
- Cook Time: 20
- Category: Dessert
- Method: Baking
- Cuisine: American
Nutrition
- Serving Size: 1 serving
- Calories: 180
- Sugar: 8g
- Sodium: 150mg
- Fat: 13g
- Saturated Fat: 8g
- Unsaturated Fat: 3g
- Trans Fat: 0g
- Carbohydrates: 13g
- Fiber: 0g
- Protein: 2.6g
- Cholesterol: 30mg