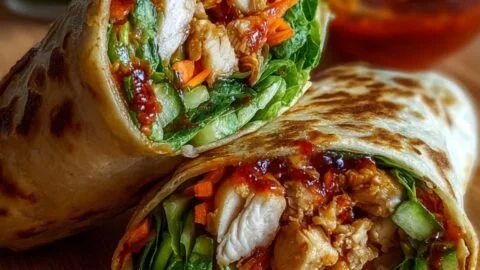
Sweet Chili Chicken Wrap
There’s a moment when warm, honeyed spice hits your tongue and the crunch of golden chicken meets cool, crisp vegetables — that’s the first bite of this Sweet Chili Chicken Wrap. Imagine the kitchen scented with toasted flour and frying oil, the sweet-tangy perfume of sweet chili and honey brightening the air, and the satisfying contrast of crunchy cabbage against tender chicken. It’s juicy, a little sticky, and totally irresistible.
This wrap is perfect for busy weeknights when you want something quick but special, for casual gatherings where everyone assembles their own, or as a celebratory snack at game day. If you’re drawn to fusion flavors or crave crispy texture with fresh accents, this recipe delivers. For another comforting bowl-style take on the sauce and flavors, try this sweet chili chicken bowl for inspiration.
Dish Snapshot
- Prep Time: 15 minutes
- Cook Time: 12–15 minutes (pan-frying)
- Total Time: 30 minutes
- Servings: 4 wraps
- Difficulty Level: Easy — great for confident beginners
Nutrition Highlights
Nutrition values are estimates calculated using USDA FoodData Central reference values and typical product labels. Individual results will vary with brands, exact portion sizes, and whether extra oil is absorbed during frying.
Estimated nutrition per serving (one wrap):
- Calories: ~670 kcal
- Protein: ~43 g
- Carbohydrates: ~90 g
- Sugars: ~25–30 g (from sweet chili sauce + honey)
- Fiber: ~4 g
- Fat: ~14 g
- Saturated fat: ~3 g
- Sodium: ~800–1000 mg
Note: These are approximate values intended to guide meal planning. For specific dietary needs (sodium limits, diabetes-friendly adjustments, etc.), consult resources such as the USDA FoodData Central or health guidance from the Mayo Clinic for personalized advice.
Why You’ll Love It
- Flavor & Texture: Sticky-sweet chili sauce and honey glaze contrast delightfully with a crisp, seasoned breading on the chicken. Fresh veggies add cool crunch that balances the richness.
- Speed & Convenience: Ready in about 30 minutes — ideal for busy evenings or a fast, satisfying lunch.
- Crowd-Friendly: Easy to scale and assemble buffet-style; everyone can add their favorite toppings.
- Comfort with a Twist: Familiar sandwich/wrap form but with bright Southeast-Asian-inspired flavors makes it both cozy and exciting.
Step-by-Step Instructions
Ingredients
- 2 Chicken breasts (boneless, skinless) — about 1 lb total
- 1 cup All-purpose flour
- 1 tsp Garlic powder
- 1 tsp Paprika
- 0.5 tsp Salt
- 0.5 tsp Black pepper
- 1 Egg (beaten)
- 2 tbsp Vegetable oil (for frying) — see tips about absorption below
- 0.5 cup Sweet chili sauce (store-bought)
- 2 tbsp Honey (add more if you like it sweeter)
- 1 tbsp Rice vinegar
- 0.5 tsp Garlic powder (for sauce)
- 1 pinch Red pepper flakes (optional, for heat)
- 4 Flour tortillas (large size)
- 2 cups Iceberg lettuce (shredded)
- 1 cup Red cabbage (shredded)
- 1 Carrot (shredded or julienned)
- 0.5 Cucumber (julienned)
- 0.25 Red onion (thinly sliced, optional)
- Fresh cilantro (for garnish or added flavor)
Optional ingredients and substitutions:
- Use whole-wheat or gluten-free tortillas (substitute cup-for-cup with gluten-free flour mix if needed).
- Swap vegetable oil for avocado oil for higher smoke point and slightly different flavor.
- For lower sugar, cut honey to 1 tbsp and use a reduced-sugar sweet chili sauce or dilute with extra rice vinegar and a splash of soy sauce.
- Make it spicy: add more red pepper flakes or a drizzle of sriracha.
Method
- Prepare the chicken: Slice each chicken breast into 3–4 strips, about 1–1.5 inches wide. Pat dry with paper towels.
- Season the flour: In a shallow bowl, combine 1 cup flour, 1 tsp garlic powder, 1 tsp paprika, 0.5 tsp salt, and 0.5 tsp black pepper. Mix well.
- Set up dredging station: Place beaten egg in a second shallow bowl. Dredge each chicken strip in the seasoned flour, dip into the egg, and then re-coat in the seasoned flour for an extra-crispy crust. Shake off excess.
- Heat the pan: Warm 2 tbsp vegetable oil in a large skillet over medium-high heat. When shimmering, add chicken strips in a single layer without crowding. Fry in batches if necessary.
- Fry until golden: Cook 3–4 minutes per side (depending on thickness) until crust is golden and internal temperature reaches 165°F (74°C). Transfer to a rack or paper towel–lined plate to drain. Tip: If your crust browns too quickly, lower the heat and finish cooking a bit longer to ensure doneness.
- Make the sauce: In a bowl, whisk together 0.5 cup sweet chili sauce, 2 tbsp honey, 1 tbsp rice vinegar, 0.5 tsp garlic powder, and a pinch of red pepper flakes. Taste and adjust sweetness or tang. For a saucier variation and flavor inspiration, compare notes with this Thai sweet chili chicken.
- Toss chicken in sauce: Place warm chicken strips in a bowl, pour the sauce over them, and toss until evenly coated. The residual heat will slightly caramelize the sauce.
- Build the wraps: Warm tortillas briefly in a dry skillet or microwave. Layer shredded lettuce, red cabbage, carrot, cucumber, and a few slices of red onion on each tortilla. Add 3–4 sauced chicken strips, garnish with fresh cilantro, and roll tightly.
- Serve immediately for best texture and flavor.
Practical tips:
- Avoid overmixing the sauce; whisk until just combined.
- Check chicken doneness with an instant-read thermometer (165°F/74°C).
- For extra crunch, briefly toast assembled wraps in a dry skillet (press gently) for 30–60 seconds each side.
Best Pairings
- Sides: Crispy sweet potato fries, simple garlic fries, or an Asian slaw with rice vinegar dressing.
- Dips & Extras: Extra sweet chili sauce, sriracha mayo, or a lime-yogurt drizzle.
- Drinks: Iced green tea or a cold lager complements the sweet-spicy notes; for a non-alcoholic option, try sparkling water with lime.
- Serving style: Present wraps whole or halved on a platter with extra sauce in a small bowl for dipping.
Storage Instructions
- Room temperature: Not recommended for more than 2 hours (per USDA food safety guidelines for perishable cooked foods).
- Refrigeration: Store components separately in airtight containers. Cooked chicken (sauced) and vegetables refrigerated will keep 3–4 days. Tortillas store separately for the same timeframe. Reheat chicken gently in an oven at 350°F (175°C) until warmed through, or in a skillet to maintain crispness.
- Freezer: Cooked, unsauced chicken strips can be frozen for 2–3 months in a freezer-safe bag; thaw overnight in the refrigerator before reheating. Freezing assembled wraps is not recommended (tortilla and fresh veg texture degrade).
Insider Secrets
- Crispiness trick: Double-coating the strips (flour → egg → flour) creates a sturdier crust that holds up to the sauce.
- Oil absorption: Use a neutral oil with a high smoke point (canola, sunflower, avocado). Heating the oil until it shimmers reduces excessive absorption. Drain on a wire rack rather than paper towels to keep crust crisper.
- Sauce balance: Always taste the sauce before tossing the chicken. More vinegar will brighten, more honey will sweeten, and a splash of soy sauce adds umami depth.
- Make-ahead: Keep sauce and veggies prepped in the fridge; cook and toss chicken just before serving for best texture.
Creative Twists
- Grilled version: Skip breading — marinate strips in a reduced sweet chili-honey mixture and grill for a lighter, smoky wrap.
- Vegan option: Use firm tofu or seitan slices, dredged and pan-fried similarly, and swap honey for maple syrup. Use gluten-free flour and tortillas for a gluten-free vegan option.
- Crunch upgrade: Add crushed toasted peanuts or roasted cashews for nutty crunch and extra protein.
- Low-carb swap: Use large butter lettuce leaves or low-carb tortillas and reduce honey to lower sugar per serving.
All Your Questions Answered
Q: Can I bake the chicken instead of frying?
A: Yes — coat chicken as instructed, place on a greased rack over a baking sheet, and bake at 425°F (220°C) for 18–22 minutes, flipping halfway, until internal temp reaches 165°F (74°C). The crust will be slightly less crisp than pan-fried.
Q: How do I make this lower in sugar?
A: Reduce honey to 1 tbsp, use a reduced-sugar sweet chili sauce, or dilute the sweet chili with extra rice vinegar and a splash of low-sodium soy sauce to keep flavor while cutting sugar.
Q: My coating gets soggy from the sauce. How can I avoid that?
A: Toss chicken lightly in sauce right before serving, and assemble wraps immediately. Alternatively, serve sauce on the side so people can control how much they add.
Q: Can I prep this ahead for a party?
A: Prep components ahead — make the sauce, shred the vegetables, and pre-coat the chicken (store dredged chicken briefly in the fridge). Fry just before serving to keep it crispy.
Q: Are there gluten-free options?
A: Yes — use a gluten-free flour blend for dredging and gluten-free tortillas. Ensure your sweet chili sauce is gluten-free (check label).
Conclusion
Bring these Sweet Chili Chicken Wraps to your next meal and enjoy the sweet, savory, and crunchy combination that’s both approachable and exciting — a guaranteed crowd-pleaser. For other takes on similar flavors and to compare techniques, check out this flavorful Sweet Chili Chicken Wraps with Lime – Crunch Time Kitchen and this popular McDonald’s CopyCat Sweet Chili Chicken Wrap – I Wash You Dry for inspiration. If you make these wraps, I’d love to hear how you customized them — leave a comment, share a photo, and join the discussion.