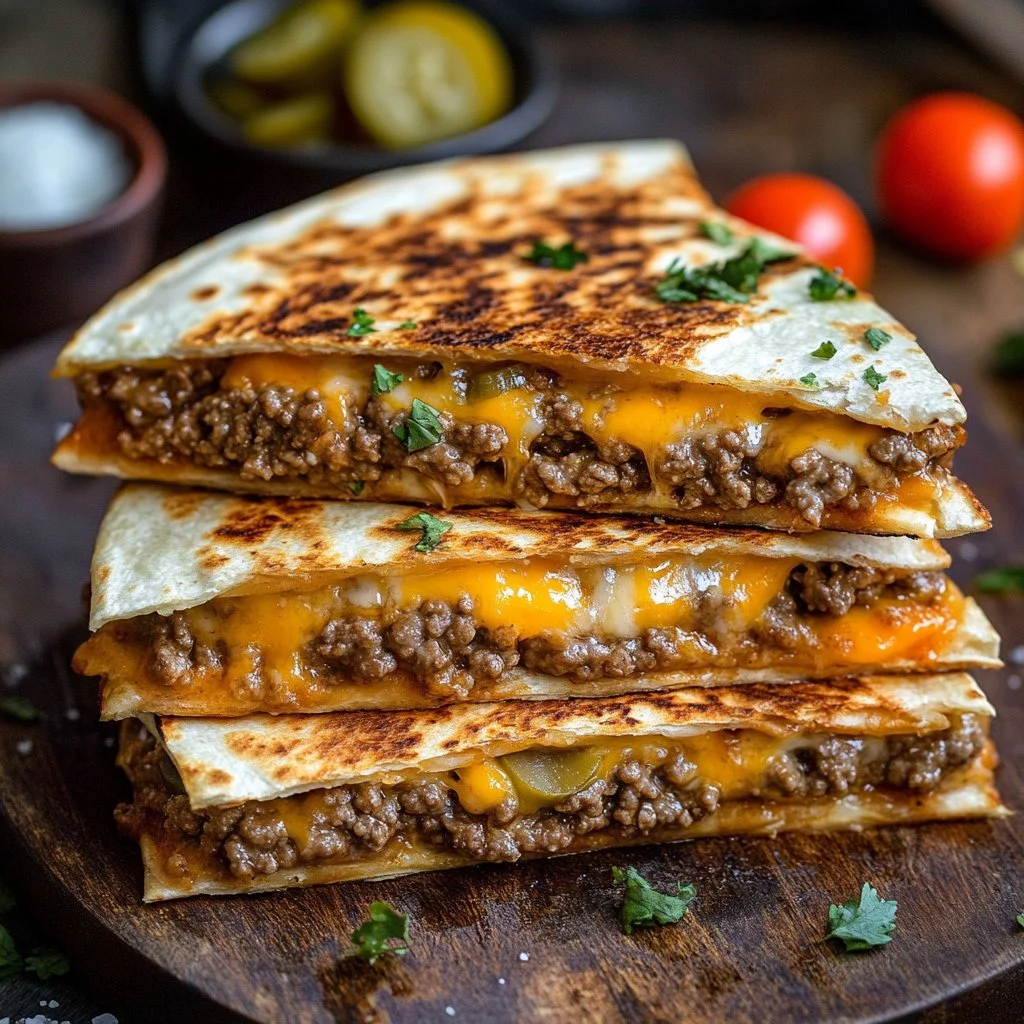
Smashburger Quesadillas
Introduction
The first bite of a Smashburger Quesadilla is an invitation: the warm, toasty tortilla gives way to a savory burst of browned beef, melted cheese that strings luxuriously between your teeth, and a whisper of caramelized onion or tangy pickles if you like. The aroma of seared beef and hot cheese fills the kitchen—comforting, familiar, a little mischievous. Texturally, you get the crisped exterior of the grilled tortilla, the juicy, slightly crusted (that delicious Maillard flavor) beef, and the gooey, sticky cheese that keeps every bite together.
This recipe hits all the right emotional notes: it’s playful enough to feel like a treat and hearty enough to satisfy real hunger. Make it for a quick weeknight dinner, a laid-back gathering with friends, a game-day snack, or even a celebratory weekend brunch. If you like the idea of turning classic burger flavors into something handheld and shareable, you’ll want to bookmark this version and come back to it often. For a similar take and ideas to riff off of, check out this detailed write-up on the same concept: Smashburger Quesadillas inspiration and tips.
At a Glance
- Prep time: 10 minutes
- Cook time: 8–12 minutes (depending on skillet and batch size)
- Total time: 20 minutes
- Servings: 4 quesadillas (1 per person)
- Difficulty level: Easy — beginner-friendly but with room for chef-level tweaks
Nutrition Highlights
(Approximate per serving — 1 quesadilla)
- Calories: ~610 kcal
- Protein: ~32 g
- Carbohydrates: ~36 g
- Fat: ~37 g
- Fiber: ~2 g
- Sodium: ~700 mg (varies with added salt and sauces)
These estimates are calculated from common USDA FoodData Central values for 80/20 ground beef, shredded cheddar, and a large flour tortilla, and are intended as a close approximation rather than an exact lab analysis. For general dietary guidance on balancing meals and sodium limits, reputable sources include government nutrition databases and clinical resources such as the Mayo Clinic and USDA FoodData Central.
Why You’ll Love It
This recipe combines two universally beloved formats—burgers and quesadillas—into one irresistible package. The fast-seared beef provides that crave-worthy crust and savory depth; the cheese gives creamy cohesion; the tortilla brings a crunchy, golden wrapper that’s both nostalgic and novel. It’s quick to execute, comfortingly familiar, and extremely versatile: feed a hungry household, impress a group of friends with minimal fuss, or calm late-night cravings. If you appreciate bold, simple flavors and hands-on food that’s fun to eat, this is your new go-to.
Step-by-Step Instructions
Ingredients
- 1 lb (450 g) ground beef (80/20 recommended for flavor and juiciness)
- 1 tsp salt (adjust to taste)
- 1/2 tsp black pepper
- 1/2 tsp garlic powder
- 4 large flour tortillas (10-inch)
- 1 cup shredded cheddar or American cheese (about 4 oz / 113 g)
- Optional: 1/2 cup diced onions (sautéed or raw), sliced pickles, chopped lettuce, diced tomatoes
- Optional sauces: burger sauce, ketchup, mustard, or your favorite dipping sauce
Substitutions
- For leaner meat: use 90/10 ground beef (reduce added oil if needed).
- For a milder cheese: use American cheese slices.
- Gluten-free: use gluten-free tortillas (see variation section).
- Vegetarian: use seasoned plant-based ground meat (see variations).
Directions
- Prepare ingredients: shred cheese, season beef with salt, pepper, and garlic powder, and arrange 4 tortillas on a clean surface.
- Heat a large skillet or griddle over medium-high heat until hot. Lightly oil if using very lean meat or a non-stick surface.
- For each quesadilla, press a small handful (about 1/4 lb / 113 g) of ground beef directly onto one half of a tortilla, forming a thin patty across that half. Season the top with a pinch of salt and pepper. Tip: press thinly to encourage a flavorful crust—this is the “smash” technique.
- Place the skillet/griddle-side down and transfer the tortilla (beef-side down) onto the hot surface. Cook beef side down for 2–3 minutes until well browned and edges start to crisp.
- Flip the tortilla so the beef side is up. Immediately sprinkle about 1/4 cup (28 g) shredded cheese over the cooked beef, fold the tortilla in half, and press lightly with a spatula.
- Grill both sides for 1–2 minutes per side until the tortilla is crispy and the cheese is fully melted. Watch closely to avoid burning.
- Remove from the pan and let rest 1 minute, then slice into wedges. Serve with optional toppings or dipping sauces.
Practical tips
- Avoid overmixing the ground beef when seasoning—gentle handling keeps the texture tender.
- Press thin for faster browning; thicker patties take longer and may not crisp as well.
- If cooking multiple at once, keep finished quesadillas warm on a baking sheet in a 200°F (95°C) oven.
- Check doneness: beef should be browned and cooked through; if using leaner beef or plant-based beef, adjust cooking time as needed.
Best Pairings
- Classic: Serve with burger sauce or ketchup + mustard on the side for dipping.
- Fresh side: A simple slaw (lime or vinegar-based) cuts the richness beautifully.
- Light drink: Iced tea or a crisp lager balances the savory, cheesy richness.
- Brunch twist: Pair with coffee and a citrusy grapefruit segment to brighten the plate.
Keeping it Fresh
- Room temperature: Do not leave cooked quesadillas at room temperature for more than 2 hours (1 hour if above 90°F / 32°C) — follow USDA food-safety guidance.
- Refrigerator: Store in an airtight container for up to 3–4 days. Reheat in a skillet or oven for best texture; microwaving will soften the tortilla.
- Freezer: Wrap individual quesadillas tightly in plastic wrap and aluminum foil or place in a freezer bag; freeze up to 2 months for best quality. Reheat from frozen in a 350°F (175°C) oven for 12–18 minutes or until heated through, flipping halfway.
Chef’s Advice
- Use 80/20 beef for flavor and juiciness; the fat helps form that golden crust and keeps the filling moist.
- Salt at two moments: lightly on the beef before cooking and adjust seasoning after cooking if needed.
- For evenly melty cheese, use shredded cheese rather than large slices; shredded melts faster and distributes more evenly.
- A cast-iron skillet or flat-top griddle gives the best crust because it holds high heat.
- Keep a spatula and a bench scraper handy for pressing and flipping; they make the “smash” technique easy and safe.
Creative Twists
- Breakfast Smash: Add a fried egg and a slice of American cheese inside the quesadilla for a breakfast-meets-burger version.
- Spicy Smash: Mix 1–2 tsp of hot sauce or a pinch of cayenne into the beef before pressing; serve with pickled jalapeños and pepper jack cheese.
- Veggie / Vegan: Use a plant-based ground beef alternative seasoned the same way and a vegan shredded cheese; cook slightly longer if needed. Add a smear of vegan “special sauce.”
- Gluten-Free: Use certified gluten-free tortillas or large corn tortillas (watch for cracking—toast gently first).
- Deluxe Burger: Add caramelized onions, sautéed mushrooms, and a small handful of greens for an elevated, restaurant-style version.
Recipe Q&A
Q: Can I make these ahead and reheat?
A: Yes—prepare, cool, and refrigerate up to 3 days. Reheat in a skillet or oven for best crispness. Frozen for up to 2 months.
Q: What’s the best cheese to use?
A: Cheddar or American cheese both work well; American melts ultra-silky, cheddar gives more flavor. Blend both for balance.
Q: How do I keep the tortilla crispy after reheating?
A: Reheat in a skillet over medium heat or in a toaster oven; avoid microwaving unless you’re okay with a softer tortilla.
Q: Can I add raw toppings (lettuce, tomato)?
A: Yes—add fresh toppings after cooking to keep them crisp. Put sauces inside before folding if you want them warmed.
Q: Is there a healthier version?
A: Use lean ground meat or plant-based ground “meat,” whole-wheat or low-carb tortillas, and moderate the cheese. Pair with a large salad to balance the meal.
Conclusion
This Smashburger Quesadilla is a joyful mash-up of two comfort classics—easy to make, deeply satisfying, and endlessly adaptable. Try the base recipe, then experiment with the variations to make it your own; share photos and tweaks with friends or in the comments so others can benefit from your discoveries. For more ideas and similar takes on cheeseburger-style quesadillas, see this tasty roundup: Cheeseburger Quesadillas with Special Sauce – 30 Minute Meal, and for a different technique-driven version of a smash burger quesadilla, check out this method-focused write-up: Smash Burger Quesadillas Recipe – Serious Eats. Enjoy, and don’t forget to pass one to someone who appreciates a good, messy, delicious bite.